 Turkey (Turkish)
 Germany (German)
 Worldwide (English)


Introduction to cPanel File Manager
cPanel File Manager is a powerful tool you can use to manage your website's files. It provides access to your files directly from your browser without using an FTP client and allows you to perform all basic file operations.
Login to cPanel
As a first step, you need to log in to the cPanel control panel provided by your hosting account. You can usually access it via the URL given to you by your hosting company (for example: https://sizinsiteniz.com/cpanel).
Find File Manager
Click on the "File Manager" icon in the "Files" section on the cPanel home page.
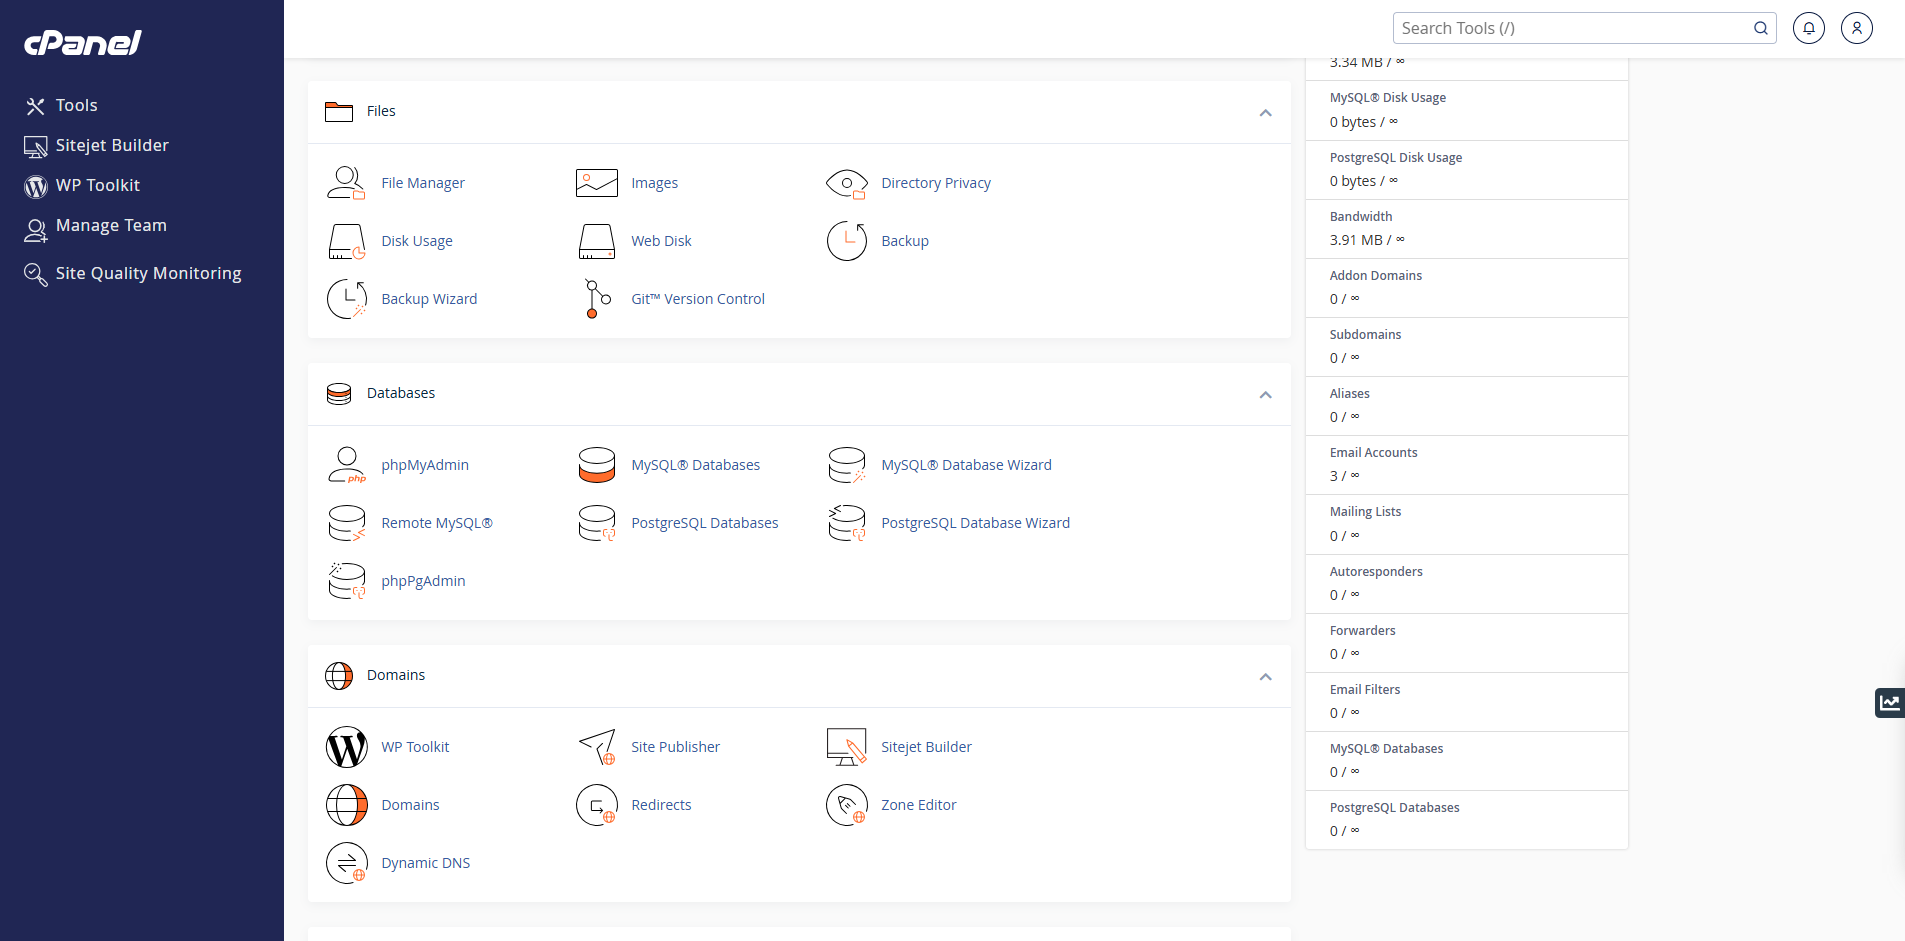
File Manager Opening Settings
When you first open File Manager, a window may appear where you can choose which directory you want to start from. Usually the "Web Root" (public_html or www) directory is chosen because this is the main directory of your website.
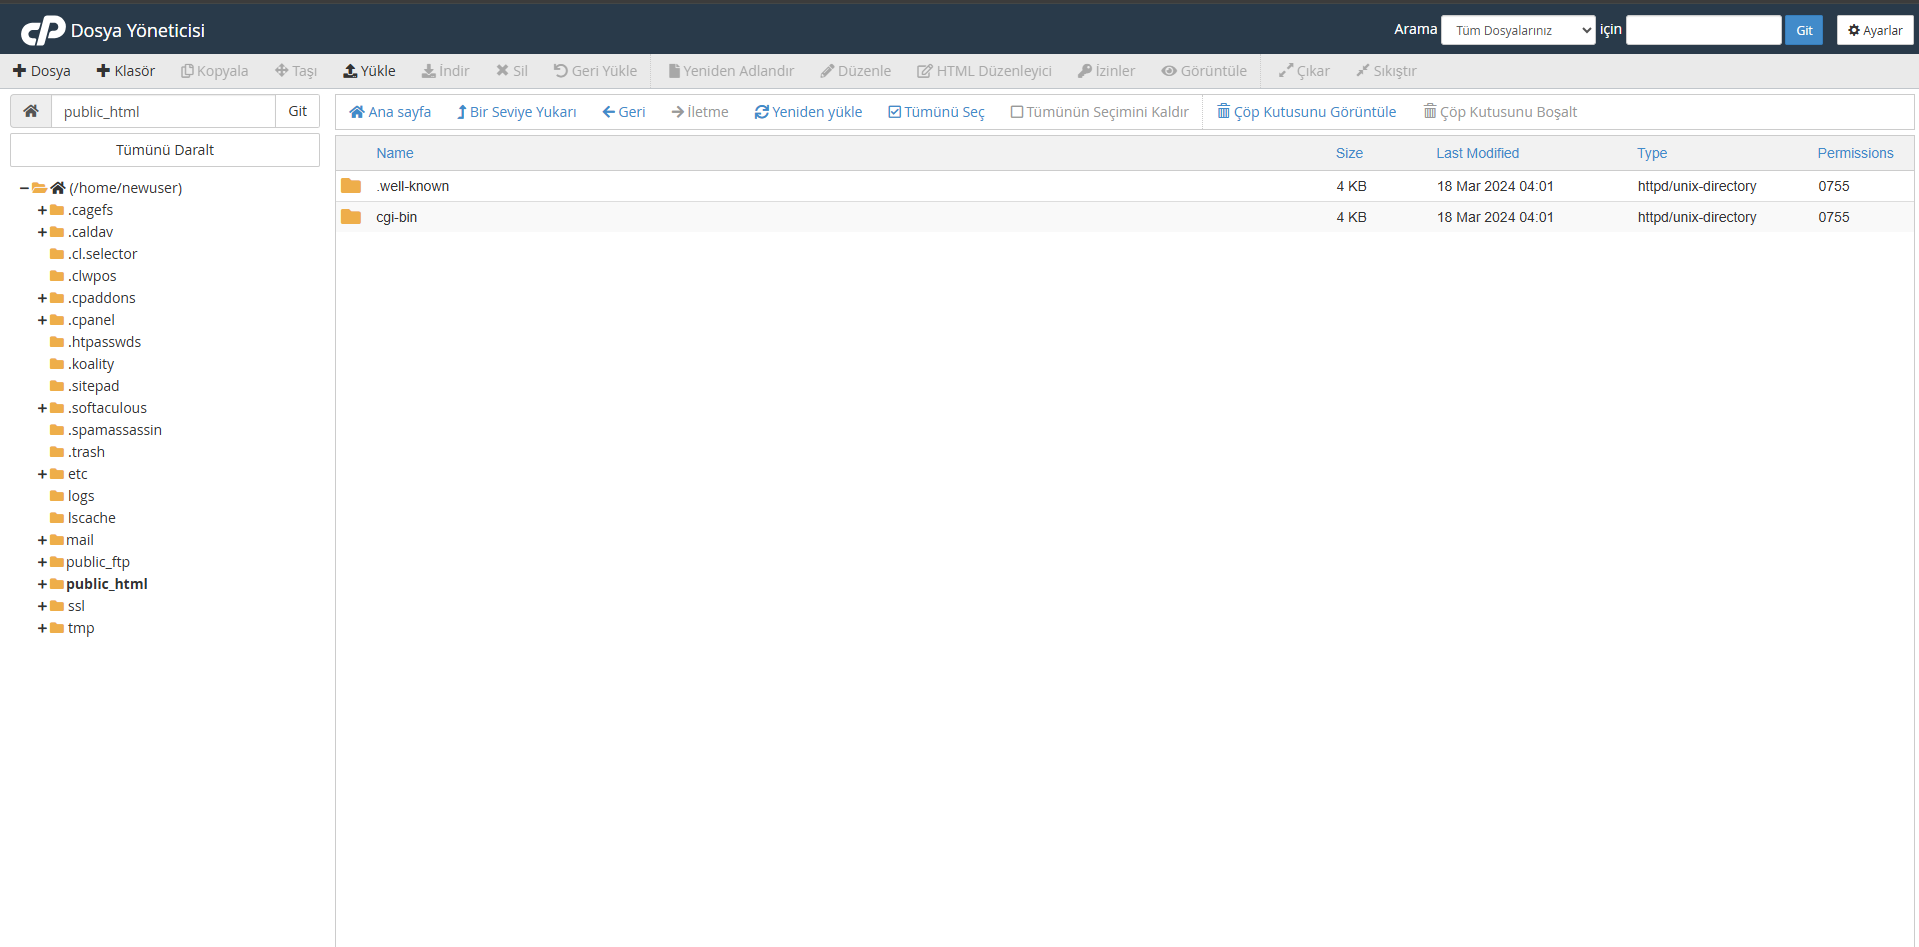
You can quickly navigate between different folders on your server using the directory tree on the left side of the File Manager. The area on the right shows the contents of the selected folder.
You can also perform common operations such as uploading, downloading, deleting and editing files using the toolbar in the top menu.
File Upload Process
You can use the easy upload features offered by File Manager to add new files to your website. Here are the file upload steps:
Open the Folder to Install
First, navigate to the folder where you want to upload your file. For example, if you want to upload a file to your website's home directory, open the "public_html" folder.
Click on the Download Button
Click the "Install" button in the top menu. This will open the file upload window.
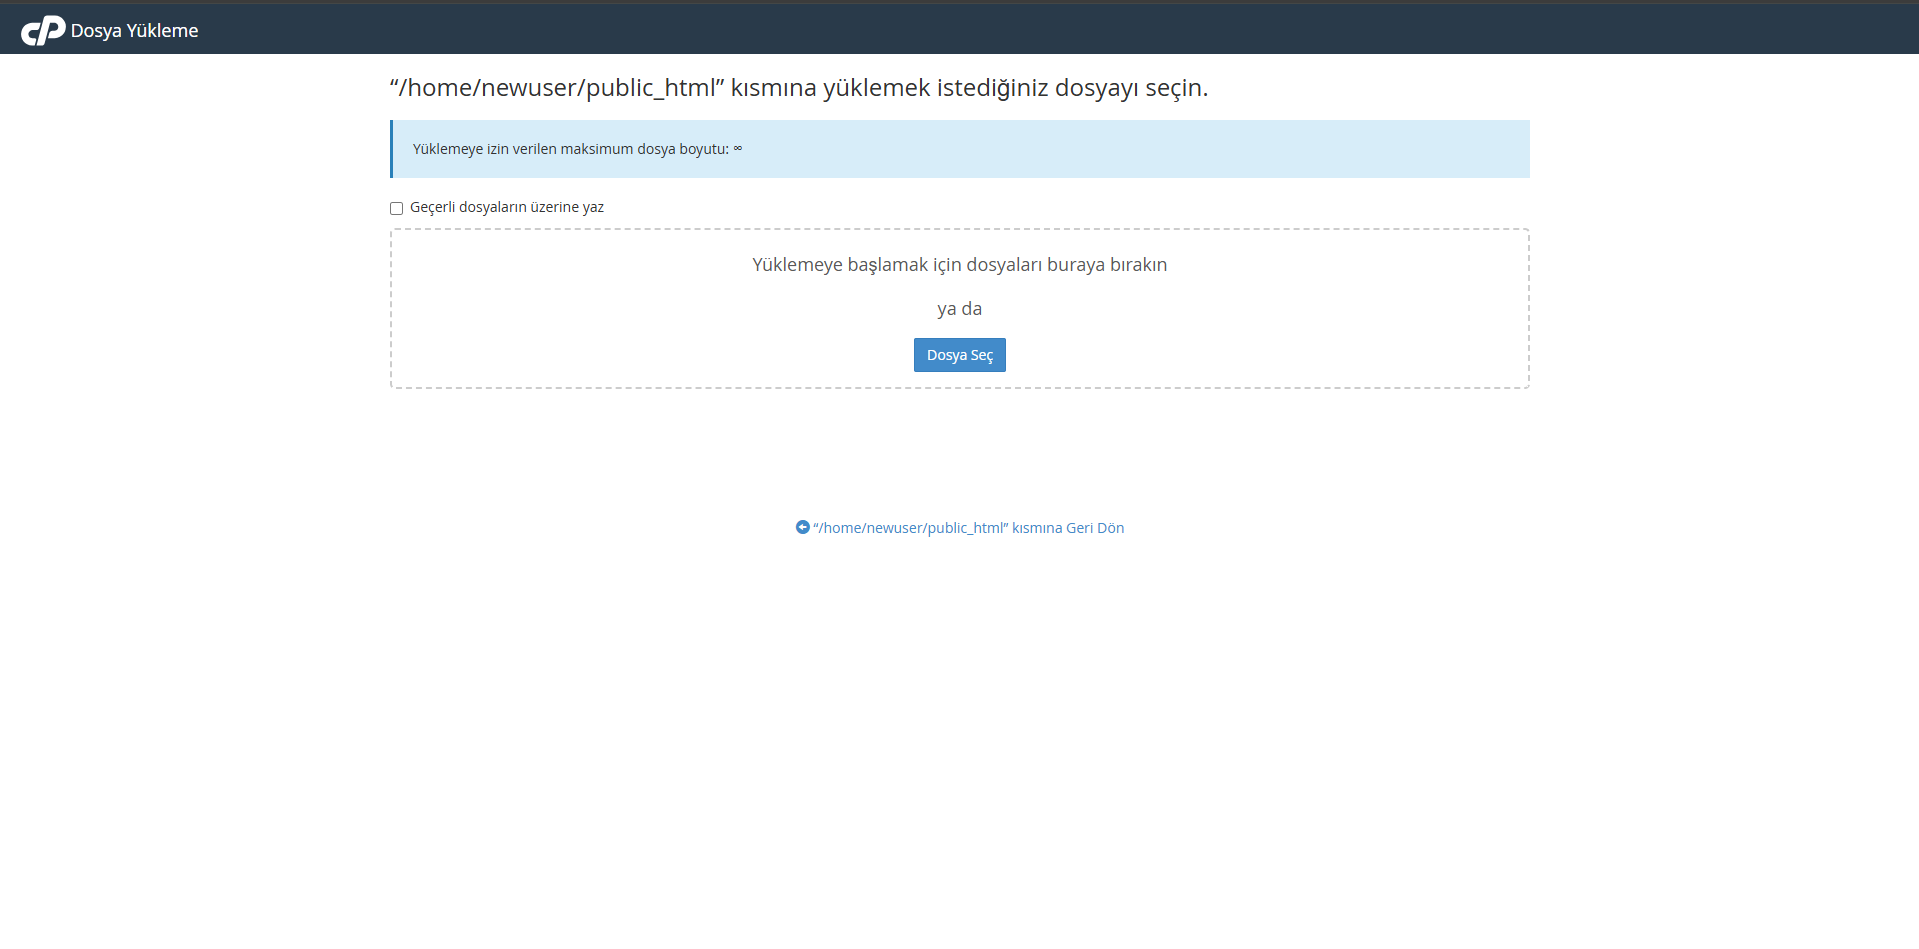
Select or Drag Files
You can select files from your computer by clicking the "Select File" button in the window that opens, or you can directly drag and drop the files to the designated area.
You can select multiple files and upload them at once.
Start Installation
After selecting the files, start the installation process by clicking the "Upload" button. A progress bar will be displayed showing the installation progress.
When the Installation is Complete, Return to File Manager
When the installation process is completed, you can return to the File Manager by clicking the "Return" button. The files you uploaded will now appear in the relevant folder.
Not: You may receive timeout errors when uploading large files (above 20 MB). In such cases, it may be better to use FTP. Also, pay attention to the maximum file size limits your server allows.
Drag-and-Drop Method
In modern browsers, you can quickly upload files by dragging and dropping them from your computer directly into the File Manager window. This method makes it easy for you to upload multiple files at once.
Editing Files and Creating New Files
With cPanel File Manager, you can directly edit text files (HTML, CSS, JavaScript, PHP, etc.) and create new files. This feature is very useful when you want to make quick changes to your website.
Editing Existing Files
Select File to Edit
Find the file you want to edit and right-click on it. Click "Edit" from the menu that opens.
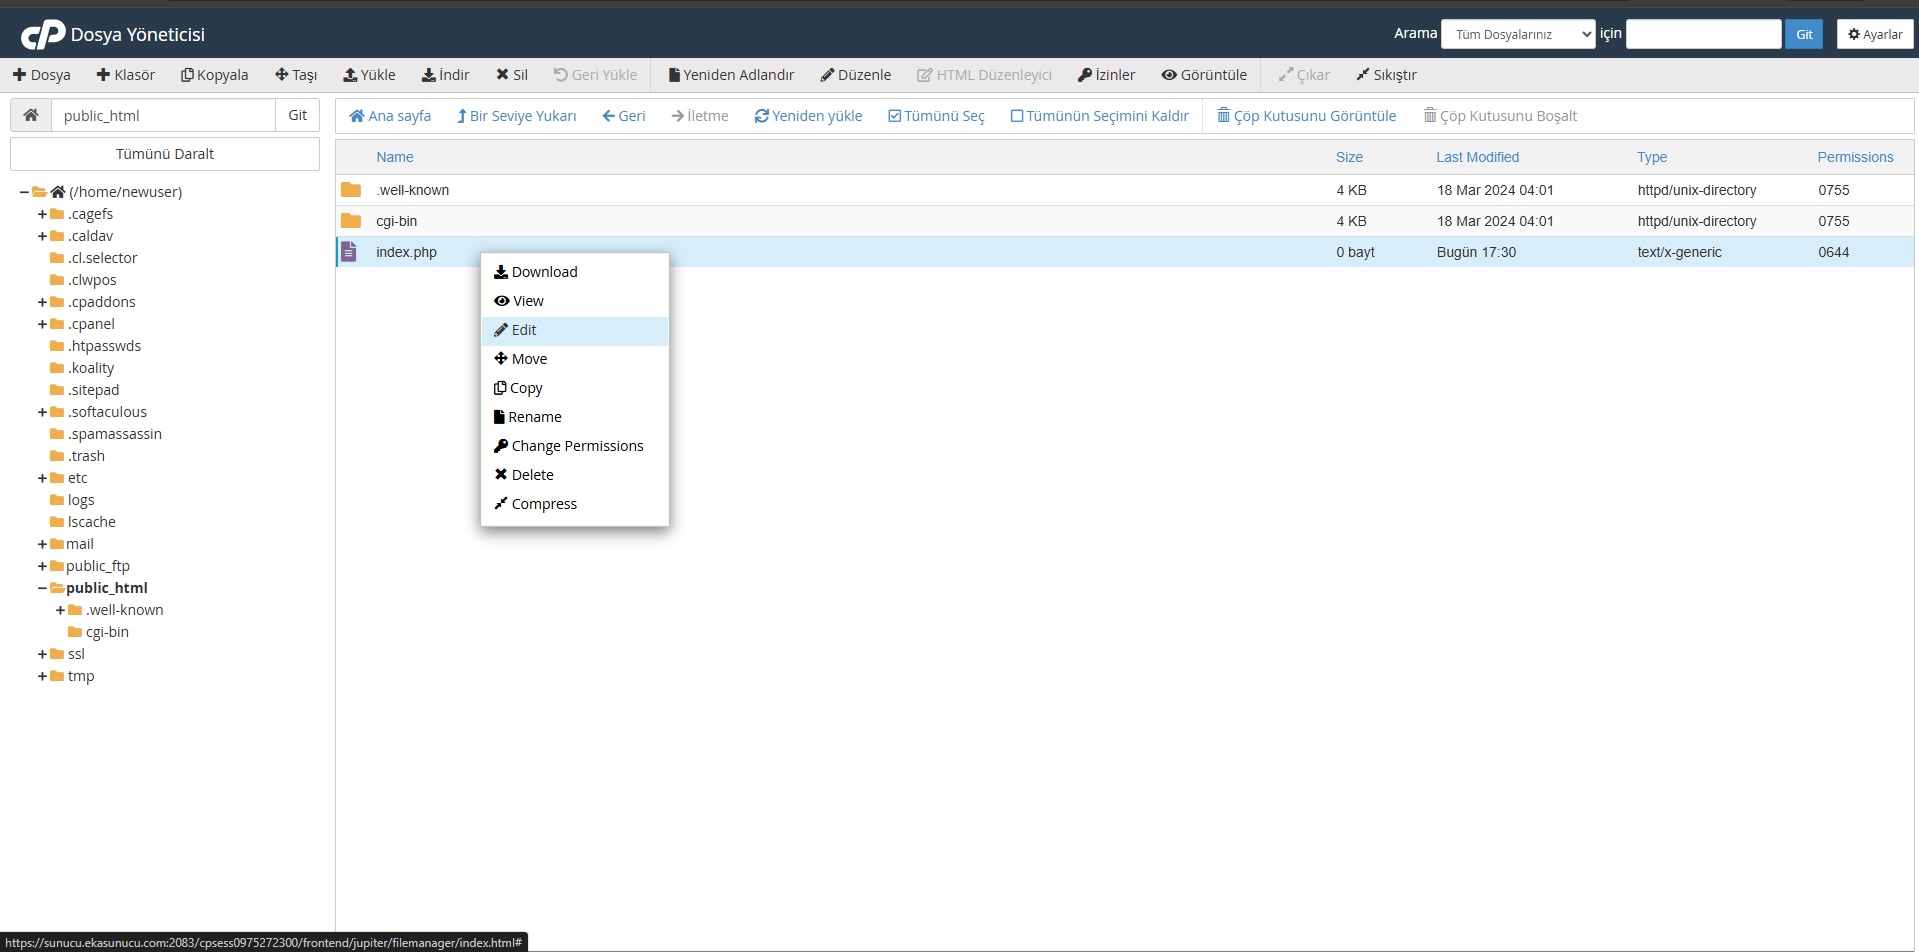
Use Editor
When the file editor opens, you will see the contents of the file. The editor has syntax highlighting for various programming languages, making code more readable.
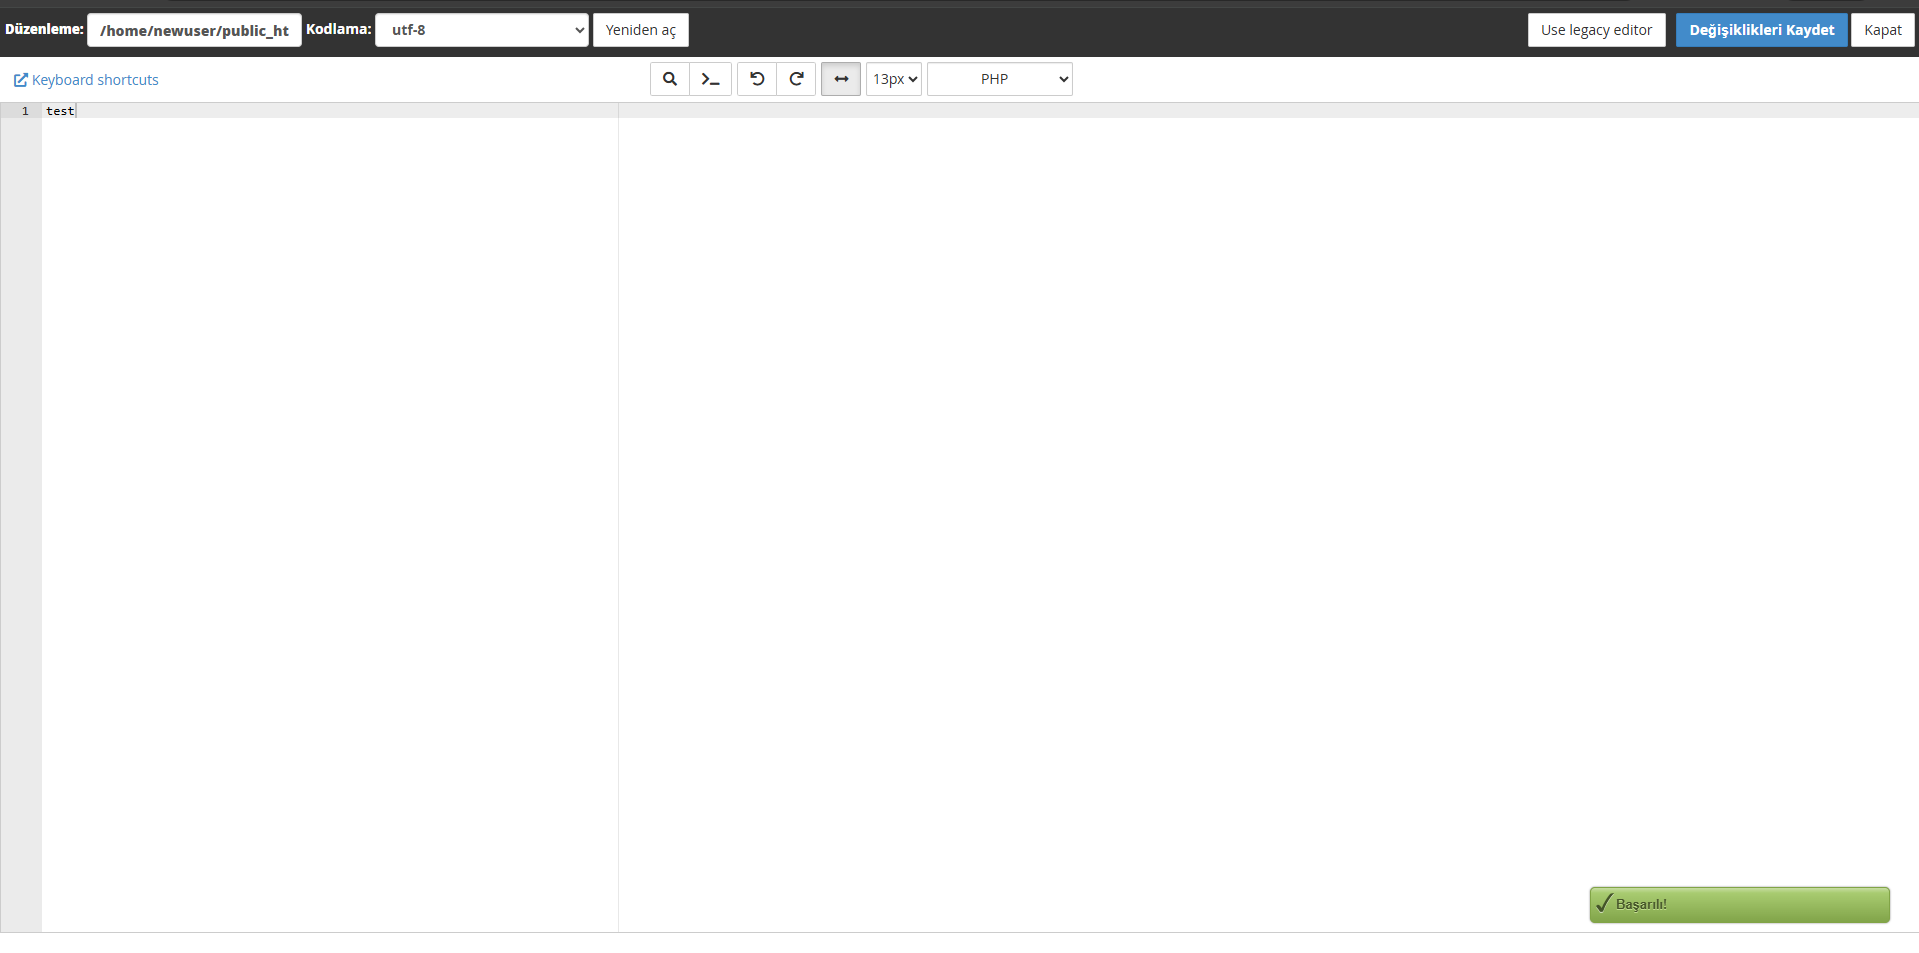
Save Changes
Once you have completed your edits, save the changes by clicking the "Save" button at the top of the page.
If you want to take a backup, you can use the "Save Backup" option. This will create a backup of the file before saving your changes.
Creating a New File
Go to Folder to Create New File
Navigate to the folder where you want to create the new file. For example, if you want to create a file on the home page of your website, go to the "public_html" folder.
Click the "New File" Button
Click the "New File" button in the top menu. This will open a new file creation window.
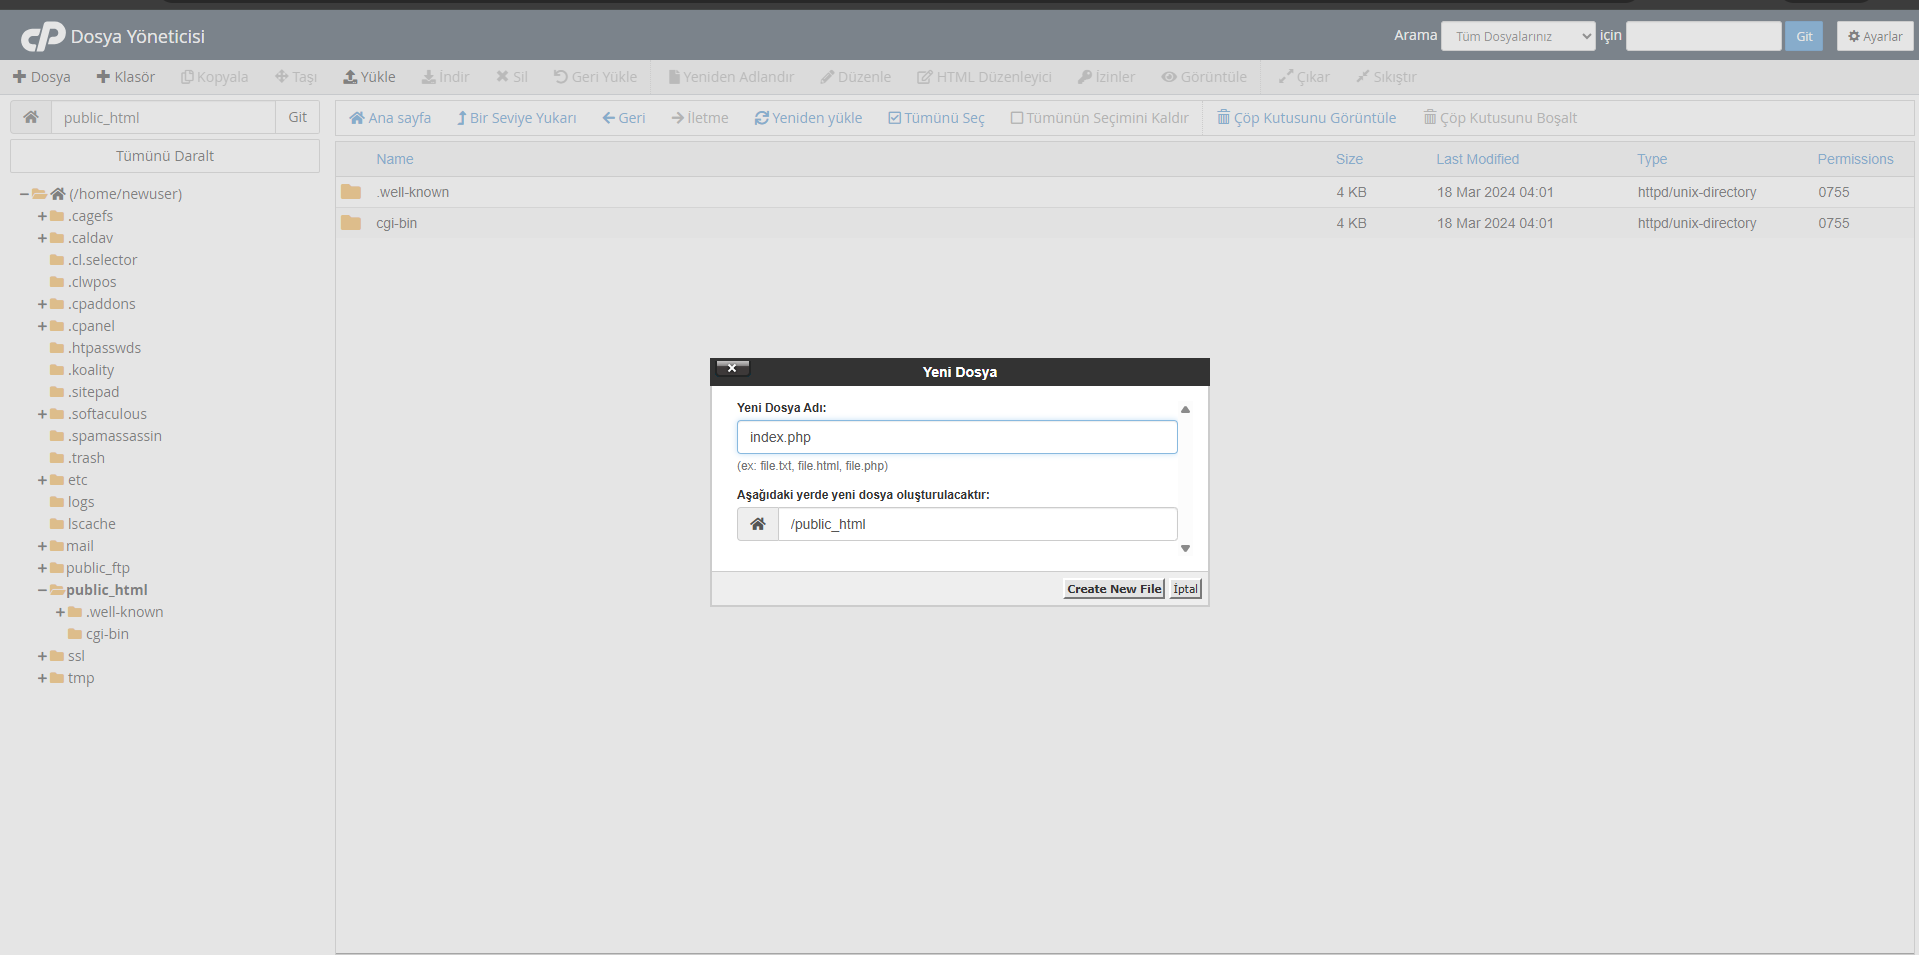
Specify File Name and Path
In the window that opens, enter the name and path of the file you want to create. For example: "contact.php" or "css/style.css".
Don't forget to specify the file extension (eg: .html, .php, .css, .js).
Create and Edit File
After clicking the "Create" button, a blank file will be created and the editing screen will open. Here you can write the file content and then click the "Save" button.
The File Manager editor is designed for editing text-based files. It is not suitable for editing binary files such as images, videos or PDFs.
For complex coding projects, it is recommended to use an advanced IDE such as Visual Studio Code, Sublime Text or PhpStorm. But for quick changes, the File Manager editor is quite useful.
Hint: Be very careful when editing the .htaccess file. An incorrect change could cause your website to become inaccessible. Always make a backup before editing.
Managing File Permissions
File permissions (chmod) are critical to the security and operation of your website. cPanel File Manager allows you to easily view and change file permissions.
Select the File whose Permissions You Want to Change
Find the file or folder whose permissions you want to change and right-click on it. Click "Permissions" from the menu that opens.
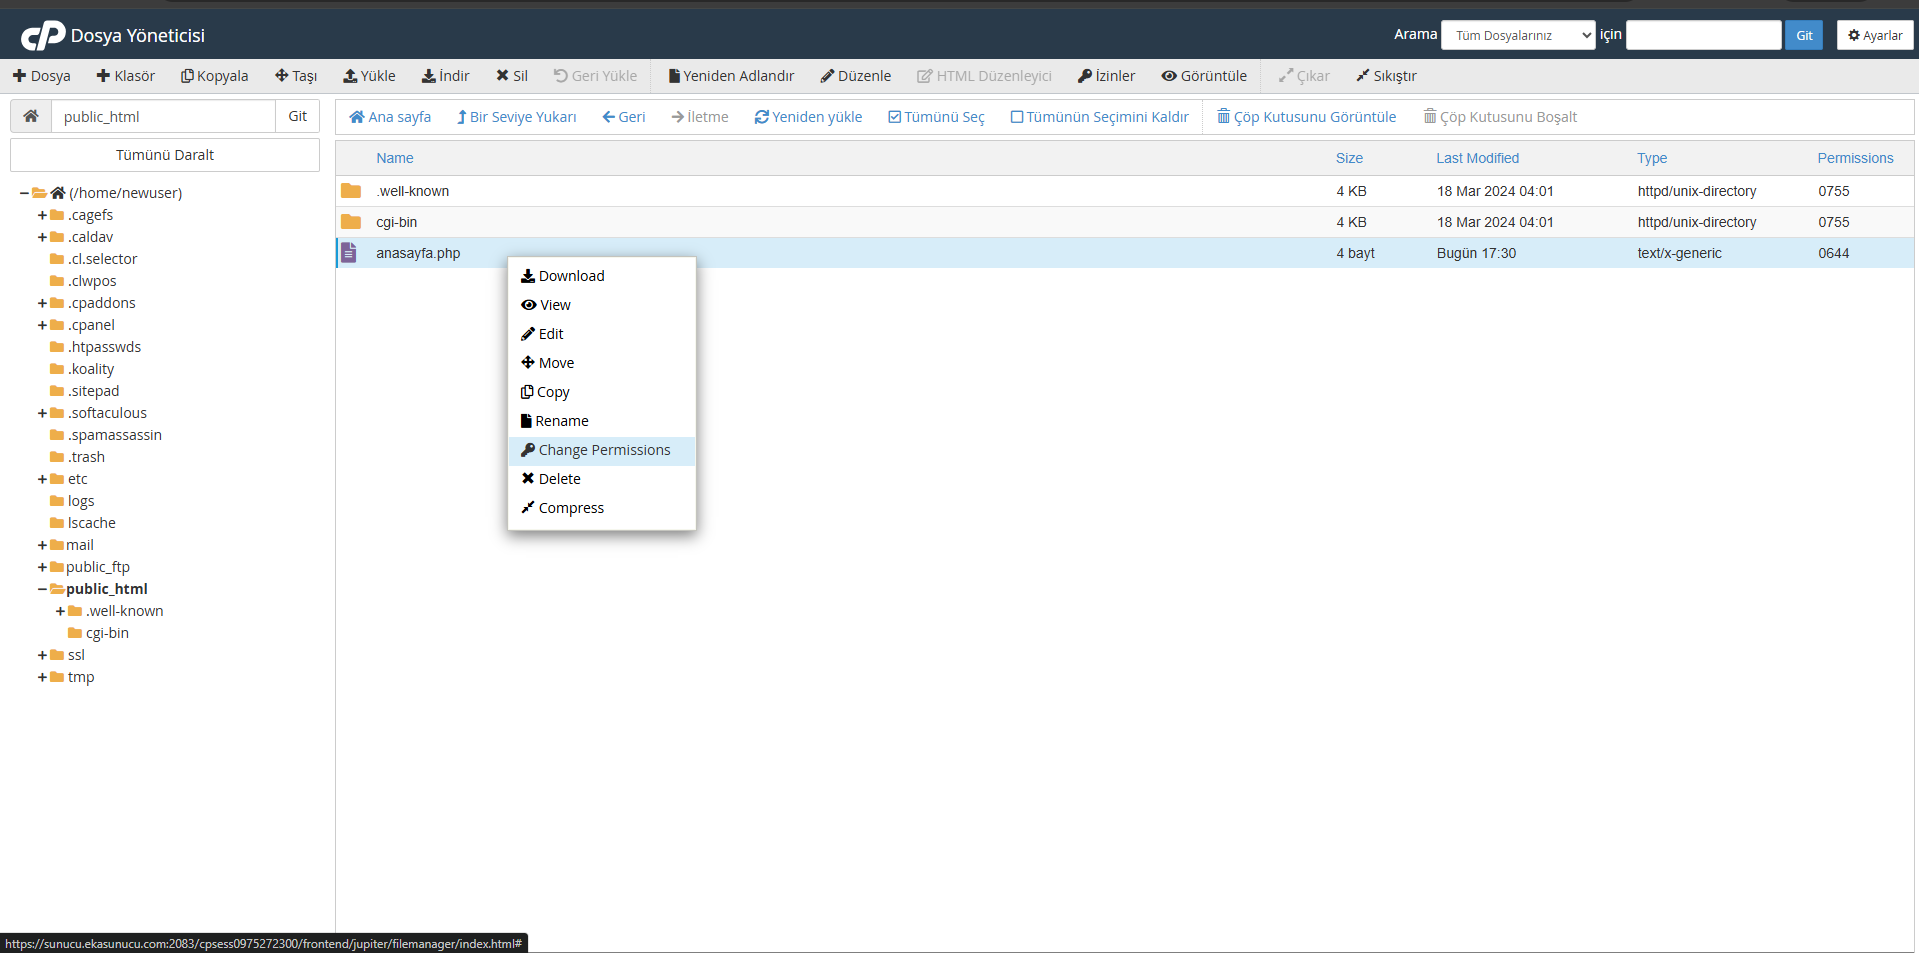
Adjust Permission Settings
In the permission window that opens, you can set who will have which permission for the file:
- Owner: The owner of the file (usually your user account)
- Grup (Group): The group the file belongs to
- Other (World): All other users
You can set three types of permissions for each category:
- Okuma (Read): Permission to read the contents of the file
- Writing: Permission to modify file
- Execute: Permission to run the file or enter the folder
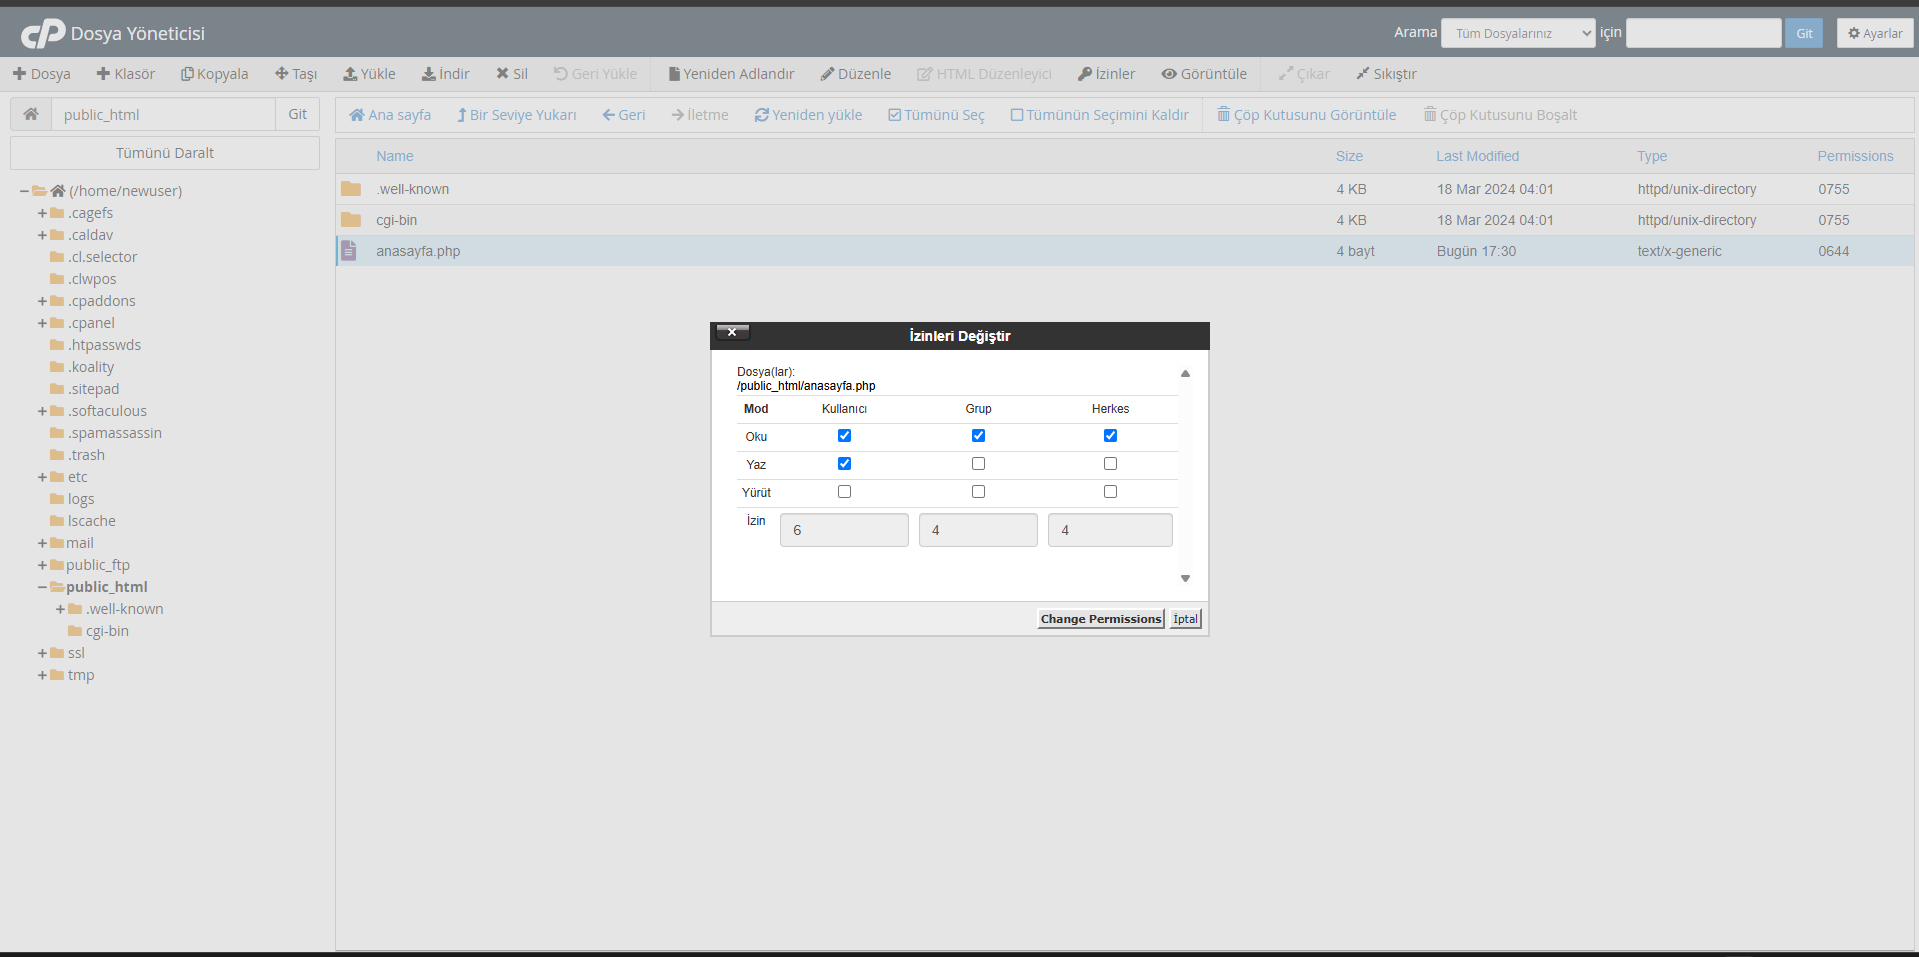
Use Numeric Values or Checkboxes
You can set permissions in two ways:
- Checkboxes: You can check the checkboxes for each permission type.
- Numeric Value: You can enter permissions in numerical format (e.g. 644, 755).
When you change the checkboxes in the window, the numerical value is automatically updated, and likewise when you change the numerical value, the checkboxes are updated.
Save Changes
After completing the permission settings, save the permission changes by clicking the "Apply Change" button.
Common Permission Values
Here are some permission values commonly used on websites:
| Permit Value | Permissions Represented | Suitable File Type |
|---|---|---|
| 644 | Owner: Reading, Writing Grup: Okuma Other: Reading |
Regular files (ex: .html, .php, .css, .js) |
| 755 | Owner: Read, Write, Execute Group: Reading, Operating Other: Reading, Operating |
Folders and executables |
| 777 | Owner: All permissions Group: All permissions Other: All permissions |
Generally not safe, do not use except in special circumstances |
| 600 | Owner: Reading, Writing Group: No permission Other: No permission |
Precise configuration files |
| 640 | Owner: Reading, Writing Grup: Okuma Other: No permission |
Configuration files that must be read by the group |
Warning: Incorrect permission settings can compromise the security of your website or cause it to stop working. Avoid using unnecessarily permissive values such as 777 , as this may pose a security risk.
The numbers in the permit values represent the sum of the following values:
- 4: Read permission
- 2: Write permission
- 1: operating permit
Therefore, 644 permission means:
- Owner: 4+2+0 = 6 (Read + Write)
- Grup: 4+0+0 = 4 (Sadece Okuma)
- Other: 4+0+0 = 4 (Read Only)
Recursive Permission Change
If you want to change permissions for a folder and all files and subfolders within it at the same time, check the "Apply recursively" option in the permissions window. This will apply the same permissions to all child elements.
Deleting Files and Folders
Deleting unnecessary files and folders will help you keep your server space clean and work more organized. cPanel File Manager allows you to delete files securely.
Select the File to Delete
Find and select the file or folder you want to delete. You can Ctrl-click (Windows) or Command-click (Mac) to select multiple items.
Click on the Delete Button
Click the "Delete" button in the top menu or right-click on the selected item and select "Delete".
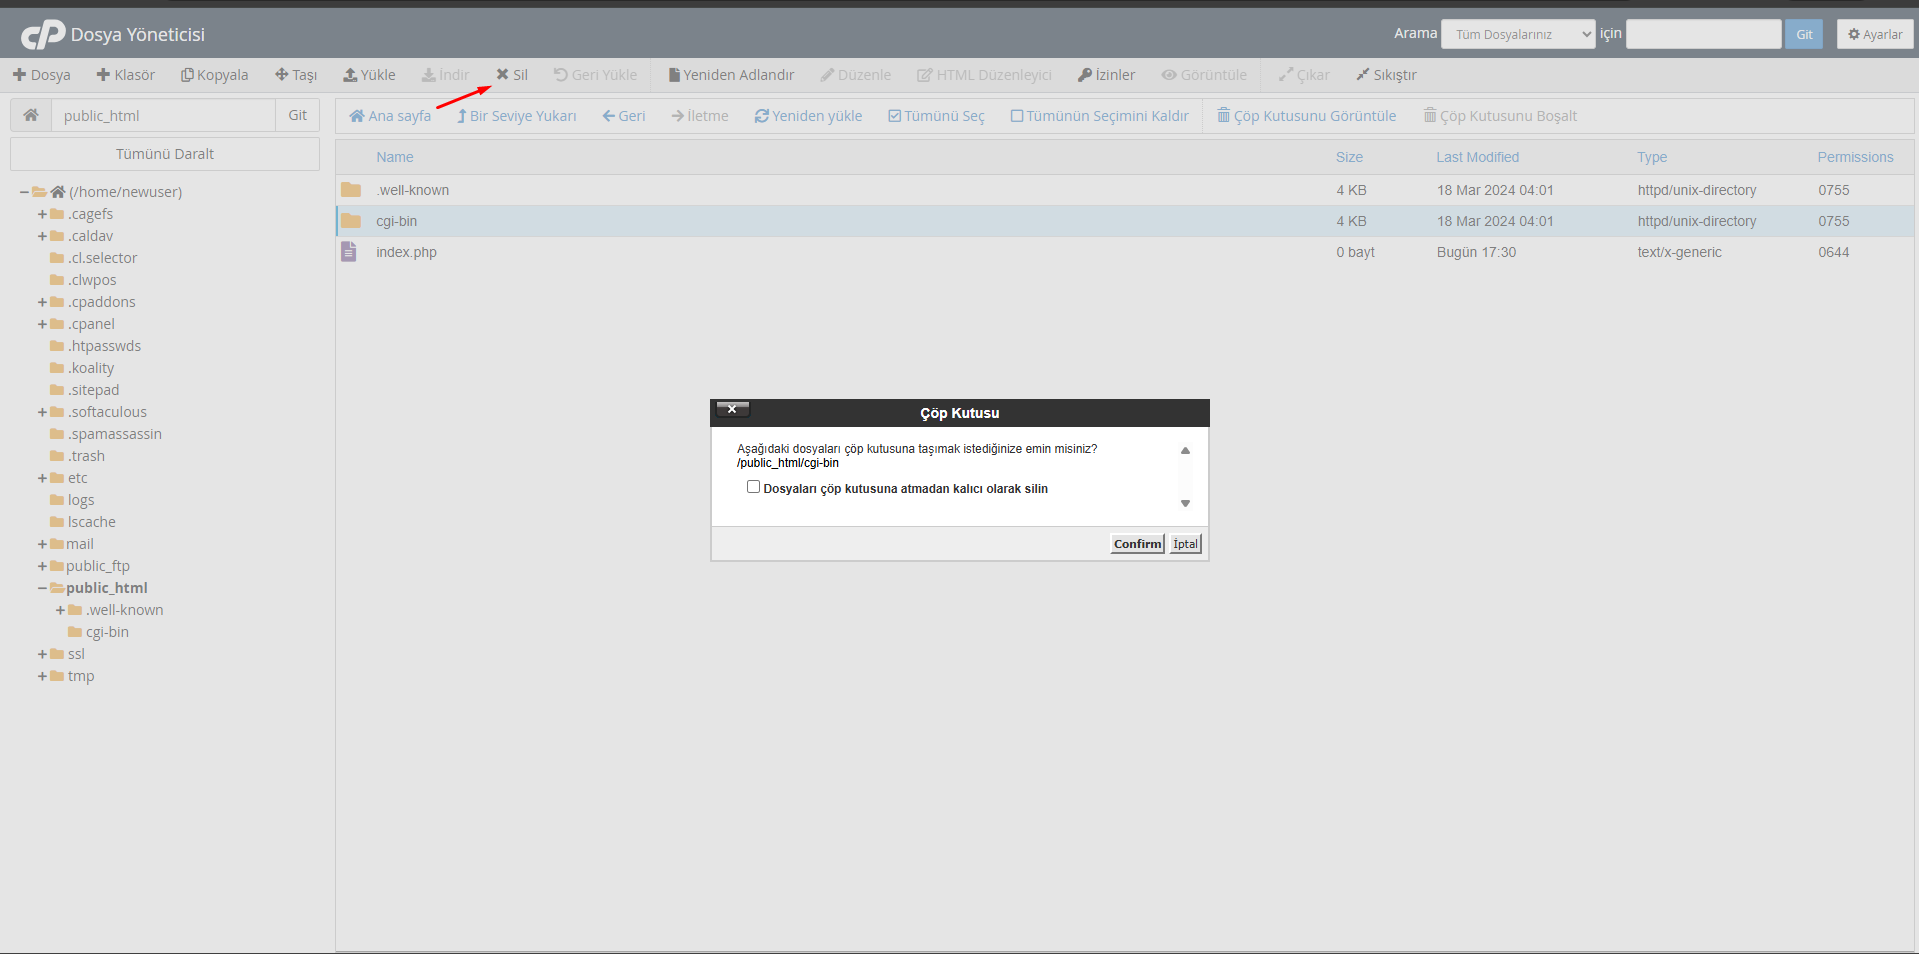
Confirm Deletion
In the confirmation window that opens, you will be asked to confirm the deletion. If the trash feature is active in File Manager, you may be given the option to move the file to the trash or permanently delete it.
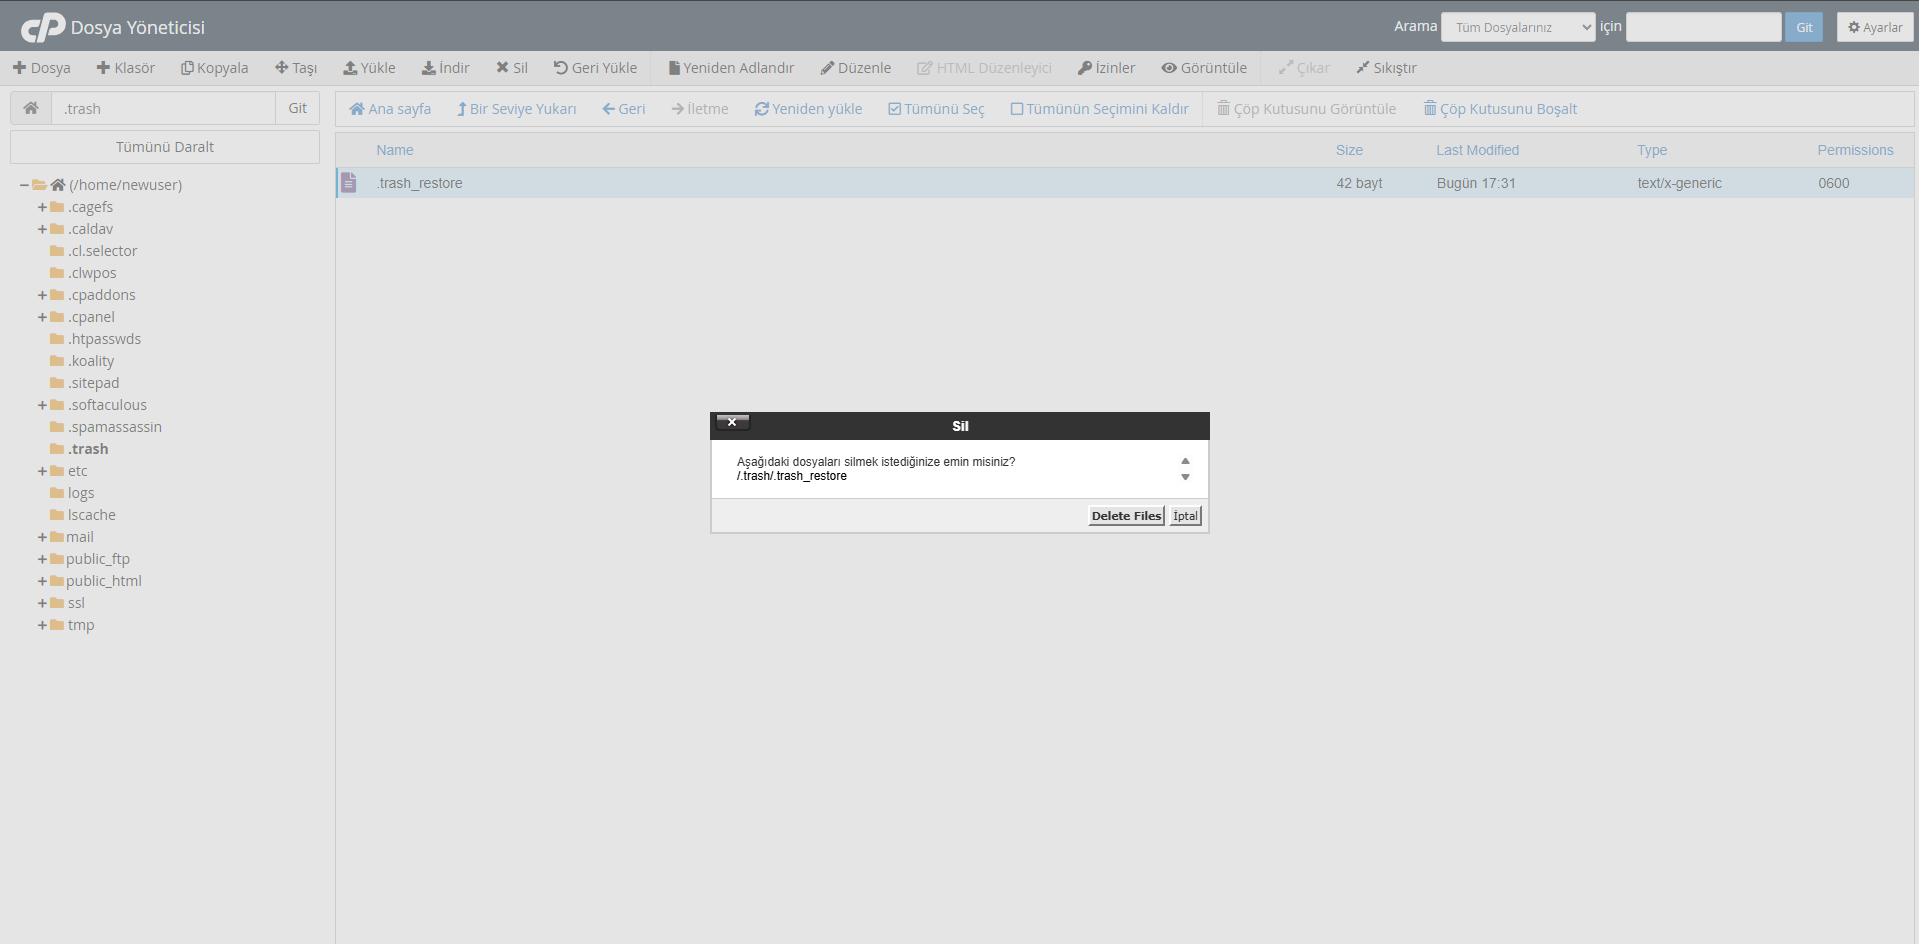
Complete the Transaction
Complete the deletion process by clicking the "Delete" button. The file or folder will now be removed from your file system or moved to the trash.
Important: Make sure to back up files that are critical to your website before deleting them. It is often not possible to recover files that have been accidentally deleted and are not in the trash.
Changing the File Name
Instead of deleting a file, sometimes it may be more convenient to change the file name. This method is especially useful when you want to temporarily disable a file to fix an issue.
Select the File and Click Rename
Select the file you want to rename, right-click and click "Rename".
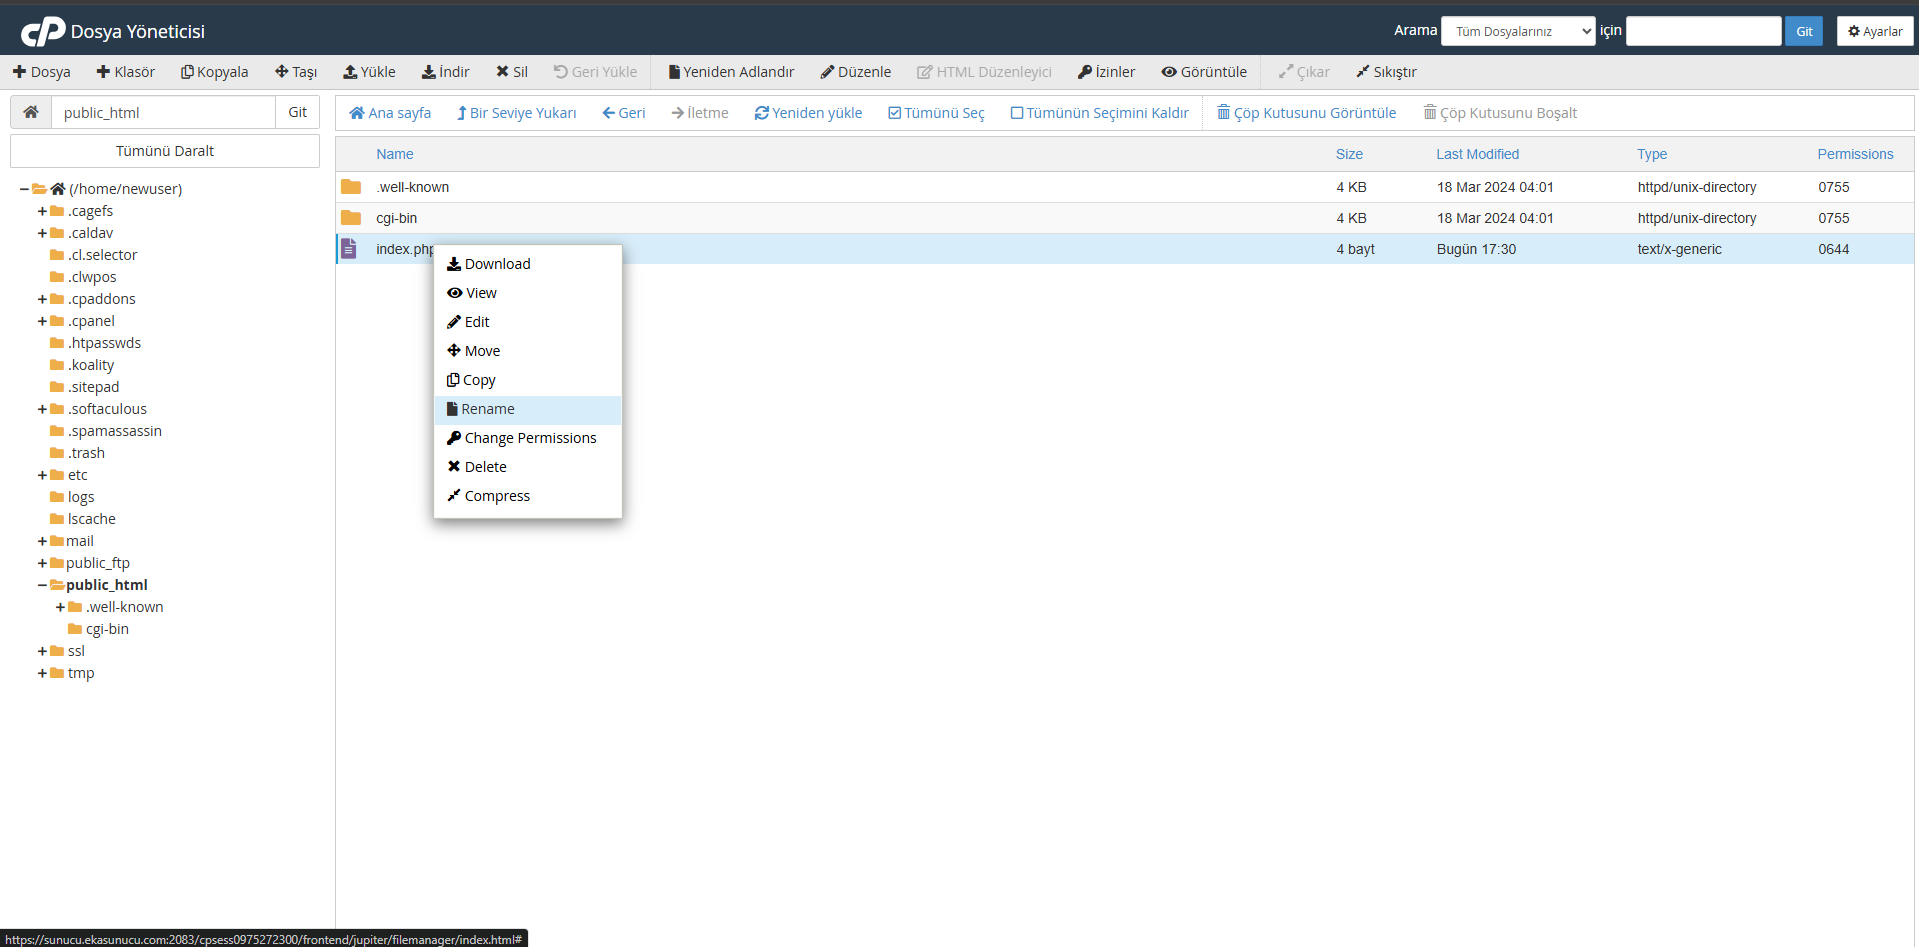
Enter New Name
In the window that opens, enter a new name for the file. If you want to disable a file used on your website, you can disable it by changing its extension (e.g. you can change index.php to index.php.bak).
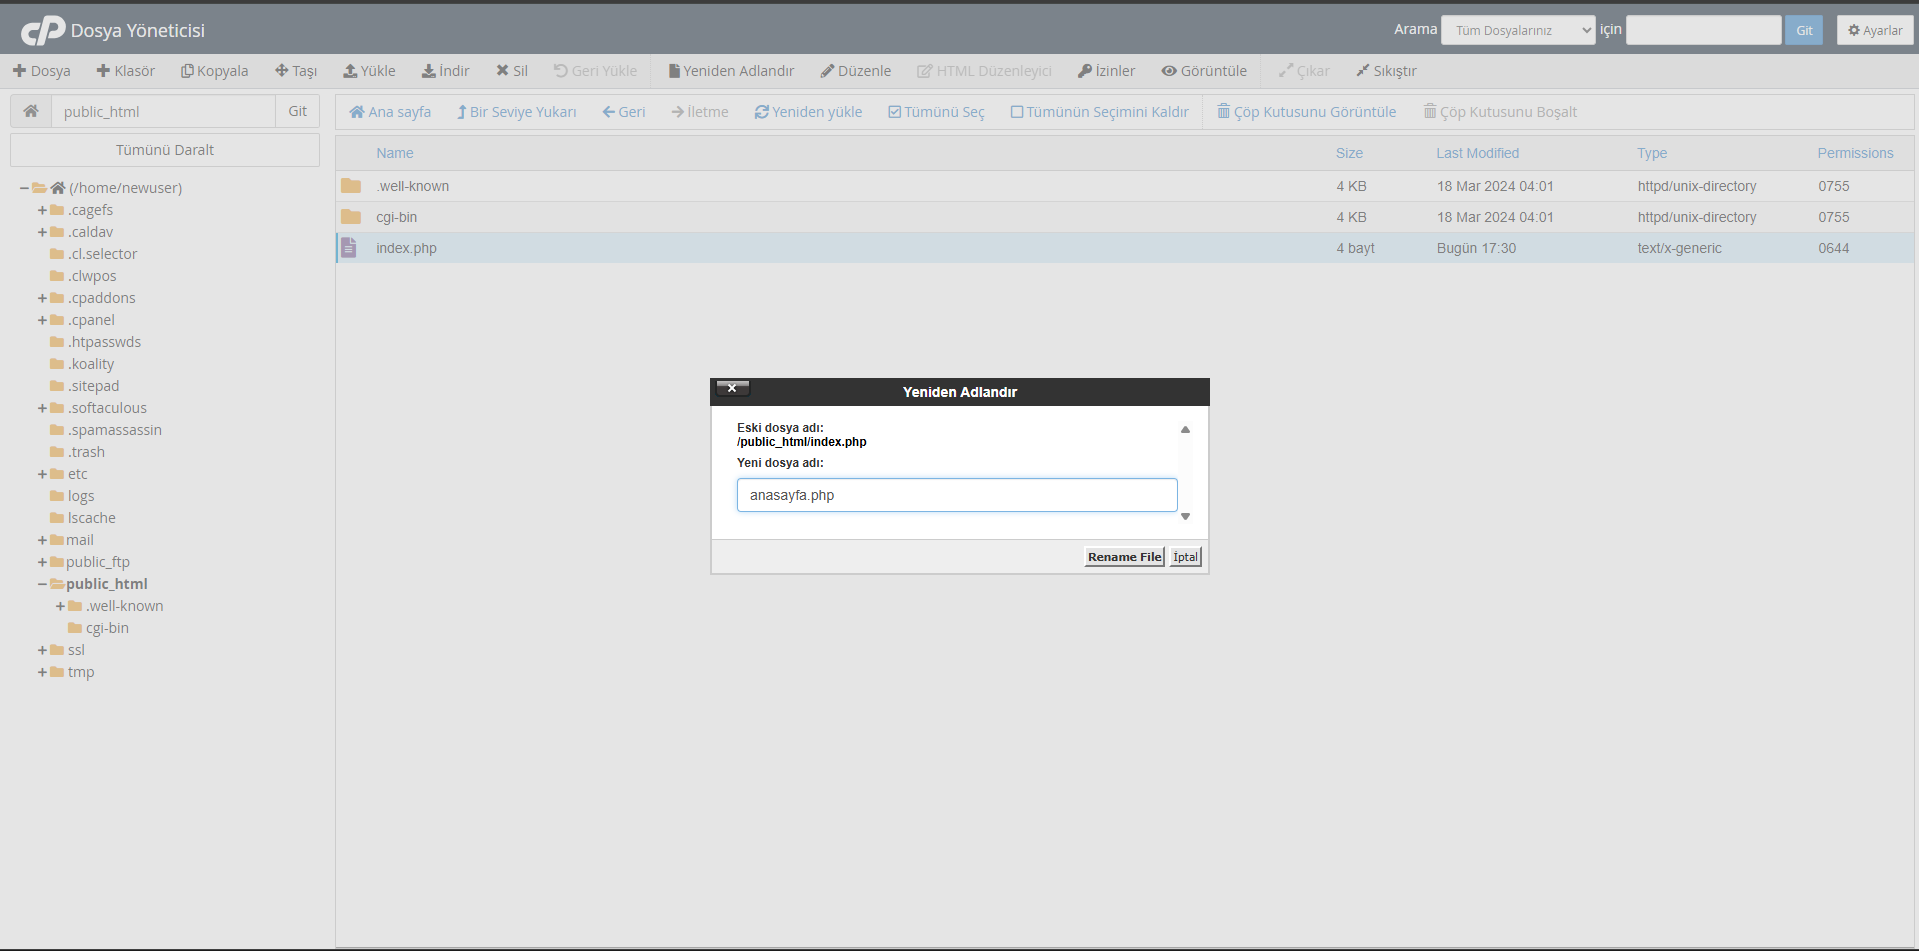
Confirm Rename
Complete the process by clicking the "Rename" button.
Be careful when deleting files on a running website. Deleting system files, especially in CMS systems (WordPress, Joomla, etc.), may cause your site to stop working.
Instead of deleting files that you are not sure are necessary for the site to work, you can disable them by changing the file extension (adding .bak or .old).
Trash Can Use
cPanel File Manager's Trash feature temporarily stores deleted files, allowing you to recover accidentally deleted files. This feature gives you an extra layer of security when working on important files.
Activate the Trash Feature
When you open File Manager, click "Settings" in the top menu. In the window that opens, check the "Use Trash" option and click the "Save" button.
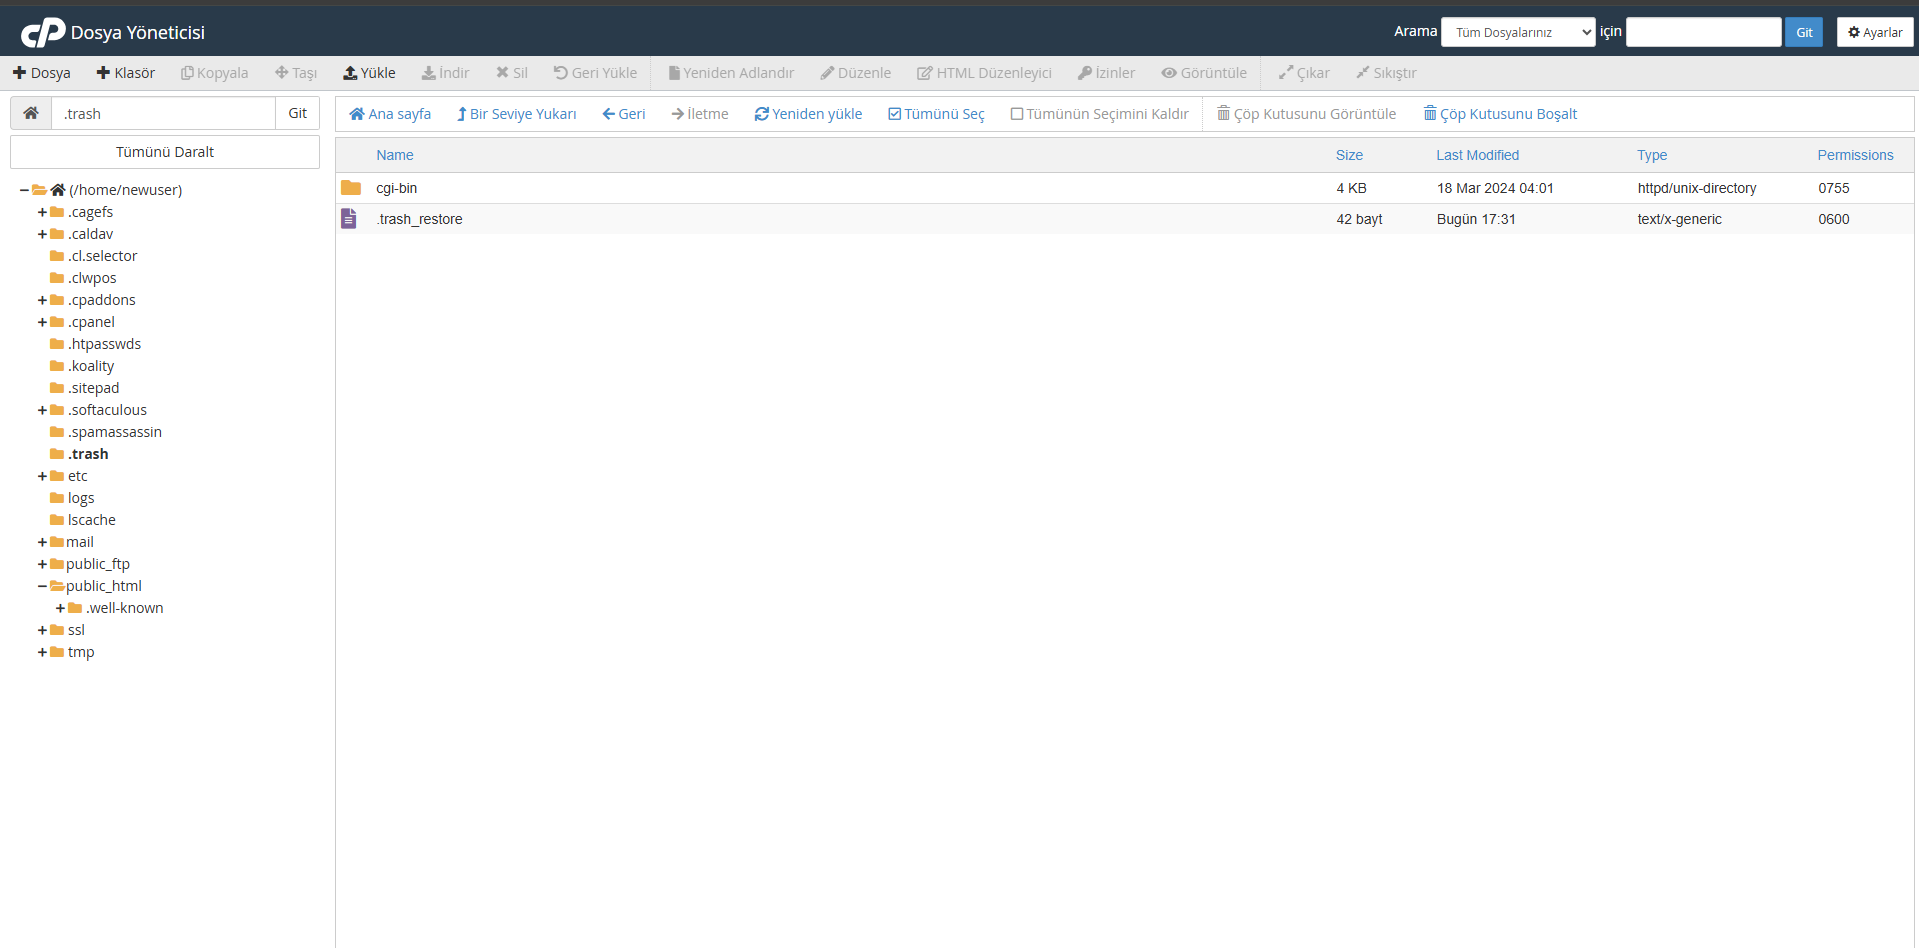
View Deleted Files
To view deleted files, click on the ".trash" directory in the left menu. This directory contains all files and folders thrown into the trash.
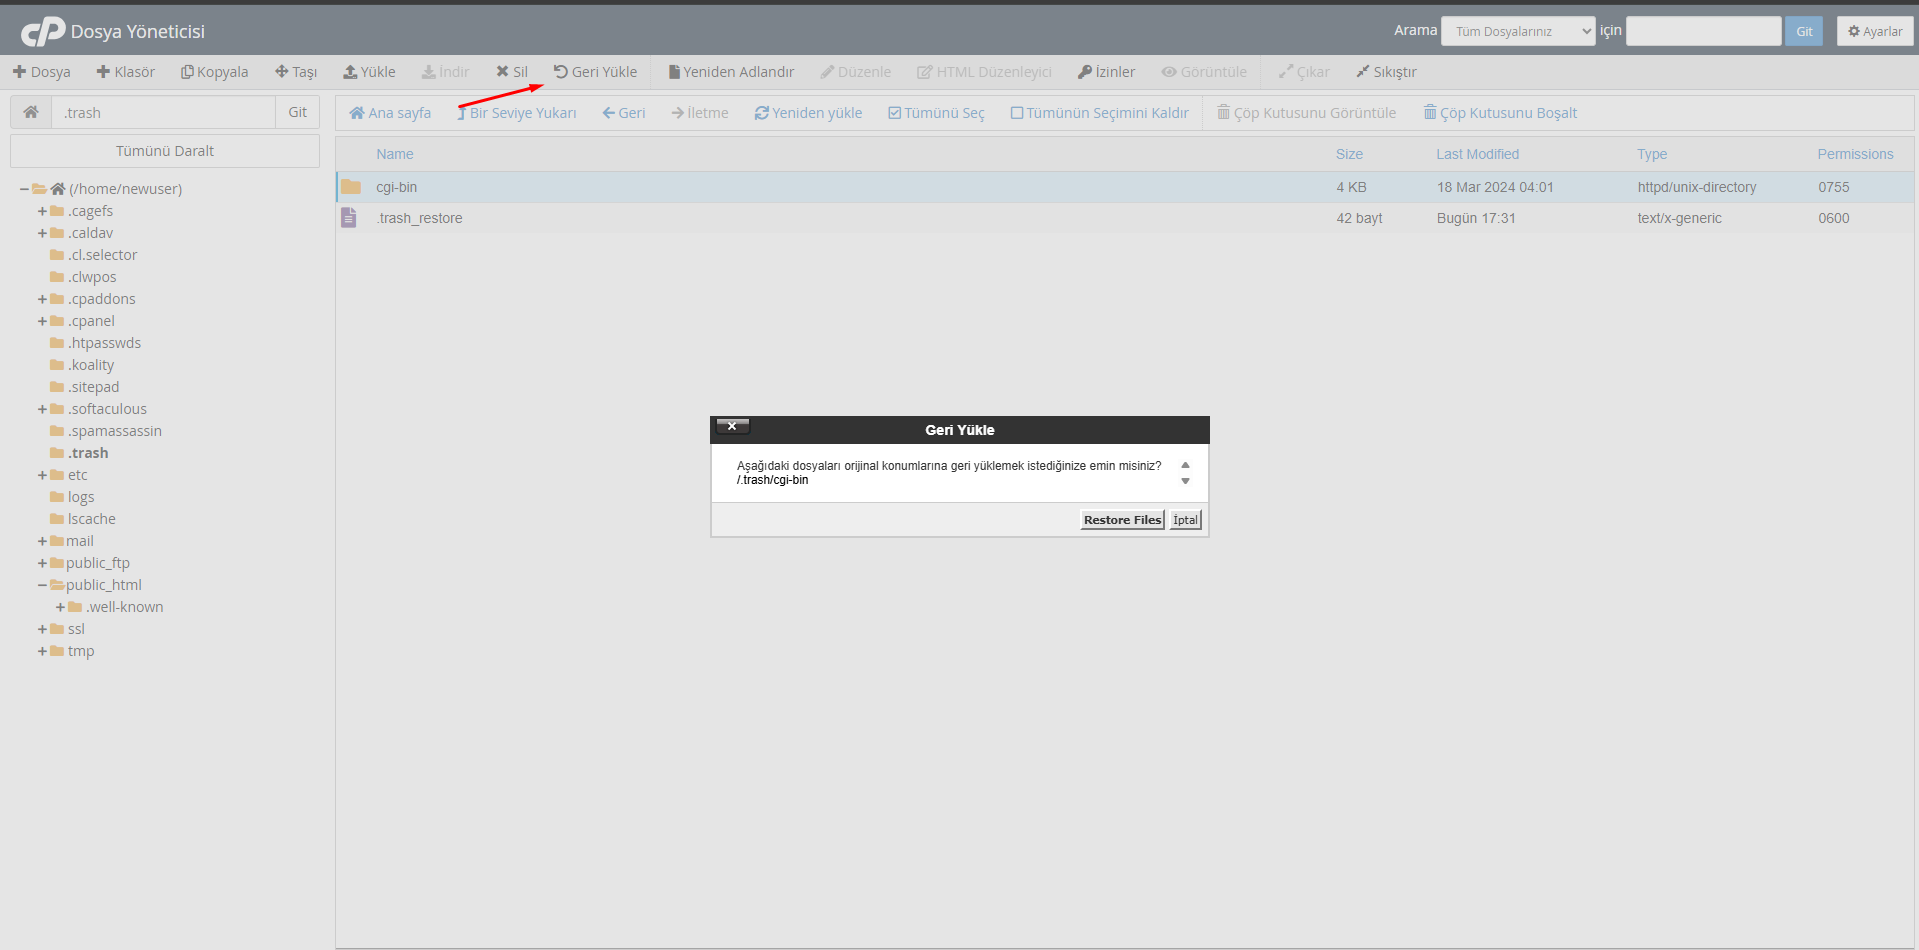
Restore Deleted Files
Select the file or folder you want to restore, right-click and click "Restore". This will place the file back in its original location.
Empty the Trash
To empty the trash, select the files in the .trash directory and use the "Permanently Delete" option. This process will permanently delete the files and there will be no way to restore them.
Trash Bin Advantages
The Trash feature allows you to easily recover accidentally deleted files. It also provides the flexibility to delete files directly and restore them if necessary, rather than disabling them before deleting.
This feature is especially useful when working on complex web applications or large websites, as it saves you time understanding the impact of an accidentally deleted file and restoring it.
Not: The Trash feature may be off by default depending on cPanel's settings. To make sure the feature is enabled in every session, check the settings when you open File Manager.
Frequently Asked Questions
What is the difference between File Manager and FTP?
File Manager is a tool that works through your web browser and allows you to perform basic file operations without having to install an FTP client. Its big advantage is that it does not require installation and can be used immediately.
FTP (File Transfer Protocol) is a special file transfer protocol that is faster and offers more features. Using FTP clients such as FileZilla and WinSCP, you can connect to your server and quickly transfer larger files and perform bulk operations. FTP is more suitable for large file transfers or complex file structures.
Why are file permissions so important?
File permissions are critical for both security and functionality:
- Security: The right permissions protect your site from hacking attempts by ensuring that only authorized users have access to certain files.
- Functionality: Some scripts and programs require certain permissions to run. For example, if a PHP script needs to upload files to a folder, that folder must have write permission.
- Preventing Errors: Incorrect permissions can cause your website to throw errors like "500 Internal Server Error".
As a general rule, 644 permission for files and 755 permission for folders is safe and functional. However, some applications may require special permissions.
How can I restore deleted files?
There are several ways to restore deleted files:
- Trash: If the trash feature is enabled in File Manager, deleted files are moved to the .trash directory. From here you can select the files and recover them with the "Restore" option.
- Yedekler: If you regularly use cPanel's backup feature, you can restore files from these backups.
- Your Hosting Provider: Most hosting companies keep their own backups. You can contact customer service and ask them to restore your files.
The best approach is to back up your critical files before editing or deleting them.
Can I run PHP codes in File Manager?
File Manager does not run PHP codes directly, but you can edit and save PHP files. To test PHP codes:
- Edit and save your PHP file
- Open the URL of the file in your web browser (ex: https://sizinsiteniz.com/test.php)
You can also test database operations or run some PHP code directly using the "PHP MyAdmin" tool available in cPanel.
For complex PHP development operations, it will be more efficient to set up a local development environment (XAMPP, WAMP, etc.).
What file types can I edit with File Manager?
File Manager's built-in editor is suitable for editing text-based files such as:
- HTML (.html, .htm)
- CSS (.css)
- JavaScript (.js)
- PHP (.php)
- Text (.txt)
- XML (.xml)
- JSON (.json)
- Configuration files (.htaccess, .ini, .conf)
It is not suitable for editing binary files such as images, videos, PDFs. To edit such files, you must first download them to your computer, edit them and then upload them again.
Manage Your Website Professionally!
Make your file management easier with our quality web hosting service. Keep your website in full control with cPanel, which offers one-click file upload, editing and management.