
 Halkali merkez neighborhood fatih st ozgur apt no 46 , Kucukcekmece , Istanbul , 34303 , TR
Eka Sunucu cloudflare training Make your website faster, safer and more accessible with. This comprehensive guide takes you through all the basic features of Cloudflare step by step.
Cloudflare; DNS management, firewall, CDN and SSL certificate It is an indispensable security and performance solution for websites that offers services such as on a single platform.
Protects your site with DDoS protection and WAF firewall
Speeds up your site with CDN and cache
Provides fast and reliable DNS management
Free SSL certificate for your websites
To benefit from the services offered by Cloudflare, you must first create an account. Creating an account is completely free and will only take a few minutes.
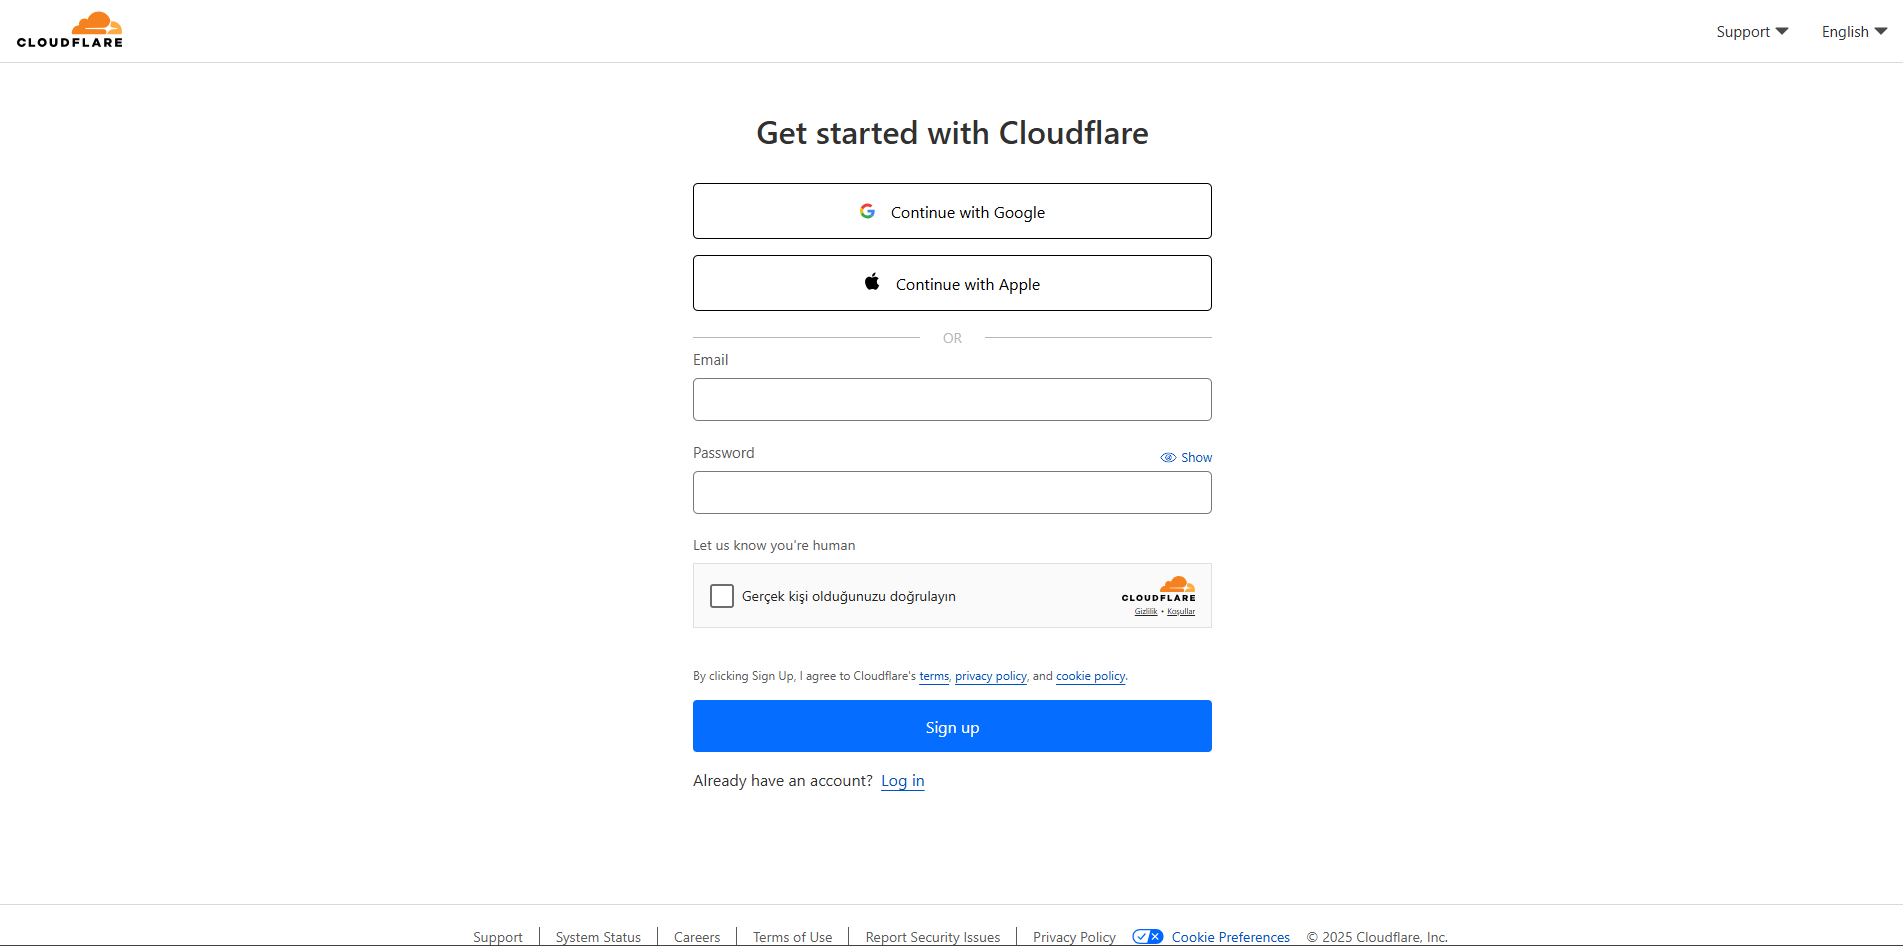
In your browser www.cloudflare.com Go to and in the upper right corner "Sign Up" Click the (Register) button.
On the page that opens, enter your e-mail address and a password you choose. Also "Terms and Conditions" with "Privacy Policy"Confirm that you have read.
After registration, a verification link will be sent to your email address. Verify your email address by clicking this link.
After email verification, it is recommended that you set up two-factor authentication (2FA) to secure your account. This step is optional but important for security purposes.
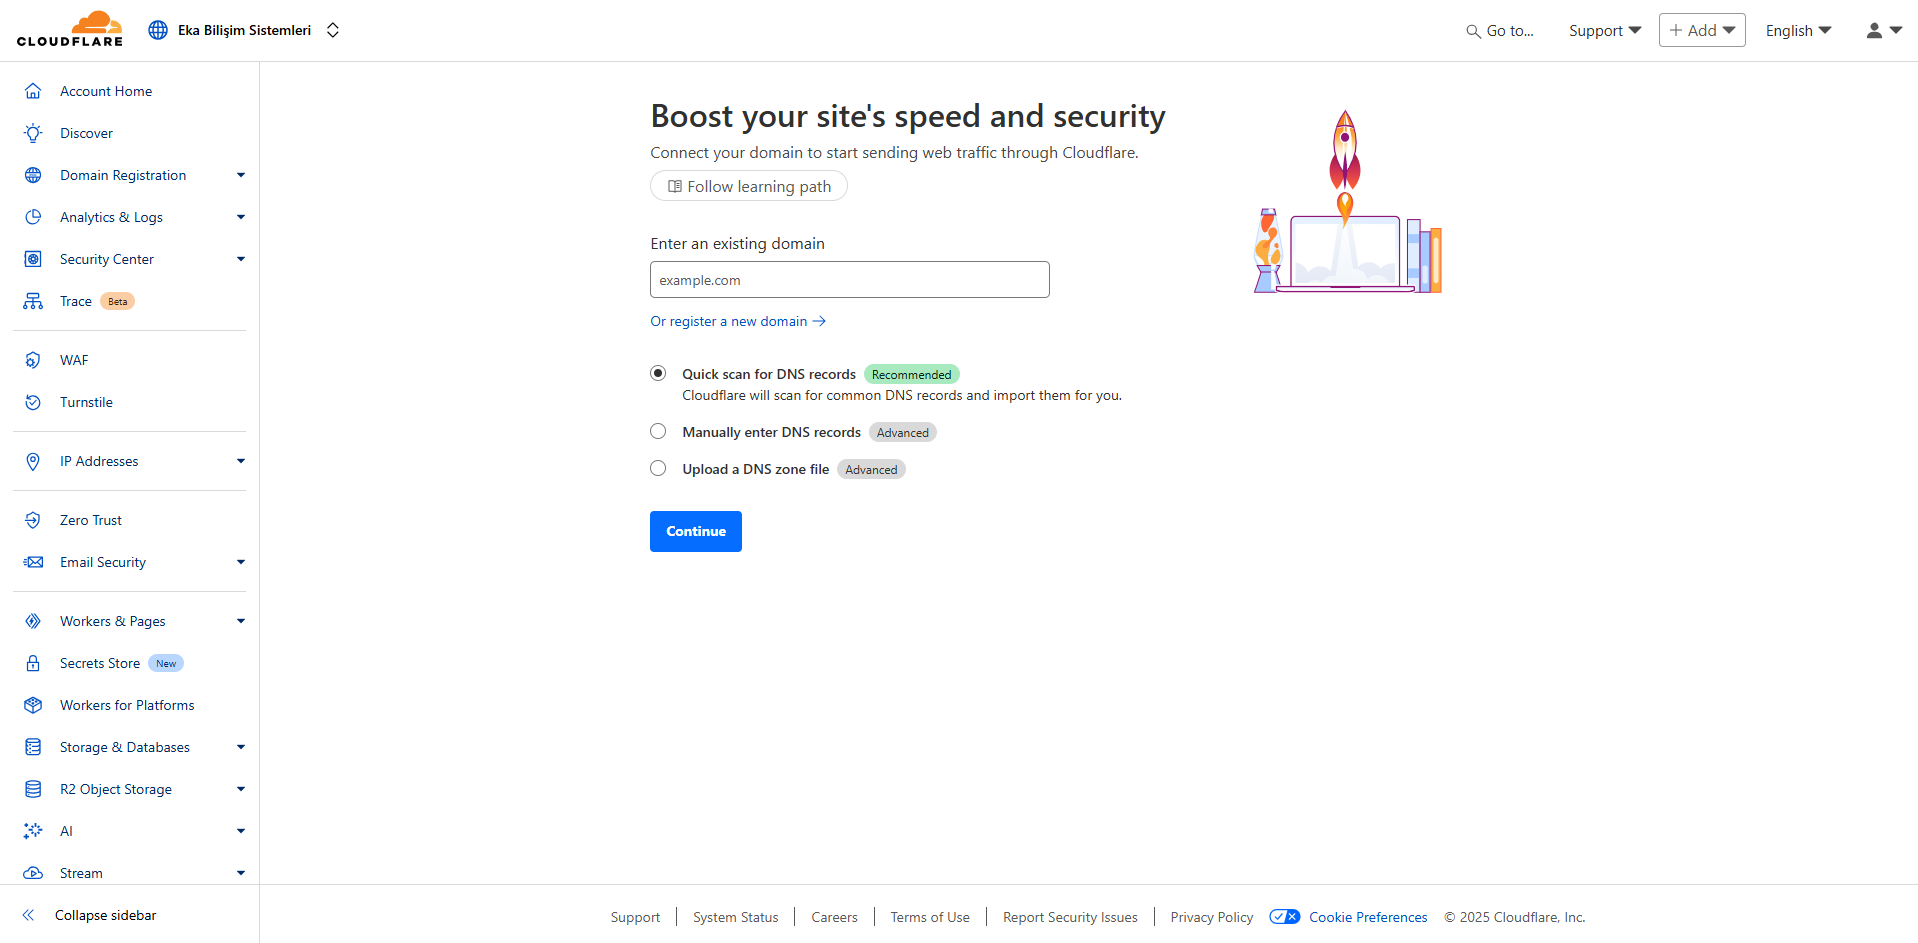
After creating your Cloudflare account, you need to add the website you want to protect and optimize to Cloudflare. Here's what you need to do step by step:
In the Cloudflare control panel "Add a Site" Click the (Add Site) button and enter the domain name of the website you want to protect (for example: examplesite.com).
Cloudflare will offer you a variety of plan options. For starters Free Plan You can choose (Free Plan). You can upgrade your plan in the future according to your needs.
Cloudflare will automatically scan and list your site's existing DNS records. Check these records and edit if necessary. If there is a missing record, you can add it manually.
Cloudflare will provide you with private nameserver information. You need to change these nameservers from the control panel of your domain registrar. Usually this change happens like this:
After making the nameserver change, it is necessary to wait for this change to spread throughout the internet. This process is usually completed within 24 hours, but can sometimes take up to 48 hours.
Once the nameserver change is propagated, Cloudflare will send you an email and you will also see a notification in your control panel. Your site is now under Cloudflare protection!
DNS (Domain Name System) is the system that translates internet domain names into IP addresses. Cloudflare's DNS management allows you to control and optimize your website traffic. You can easily manage your DNS records via Cloudflare.
DNS record types and management in Cloudflare are as follows:
The A record points a domain to an IPv4 address. For example, if your site's IP address is 192.0.2.1 , you create an A record for example.com.
How to Add A Record?A CNAME record points one domain to another domain. For example, it is used to redirect blog.example.com to example.com.
How to Add a CNAME Record?The MX record specifies where to direct email traffic. If you use services like Gmail, Microsoft 365 , you need to add their MX records.
How to Add MX Record?TXT registration allows you to add text information to your domain. It is often used for email verifications (SPF, DKIM) and proving domain ownership.
How to Add a TXT Record?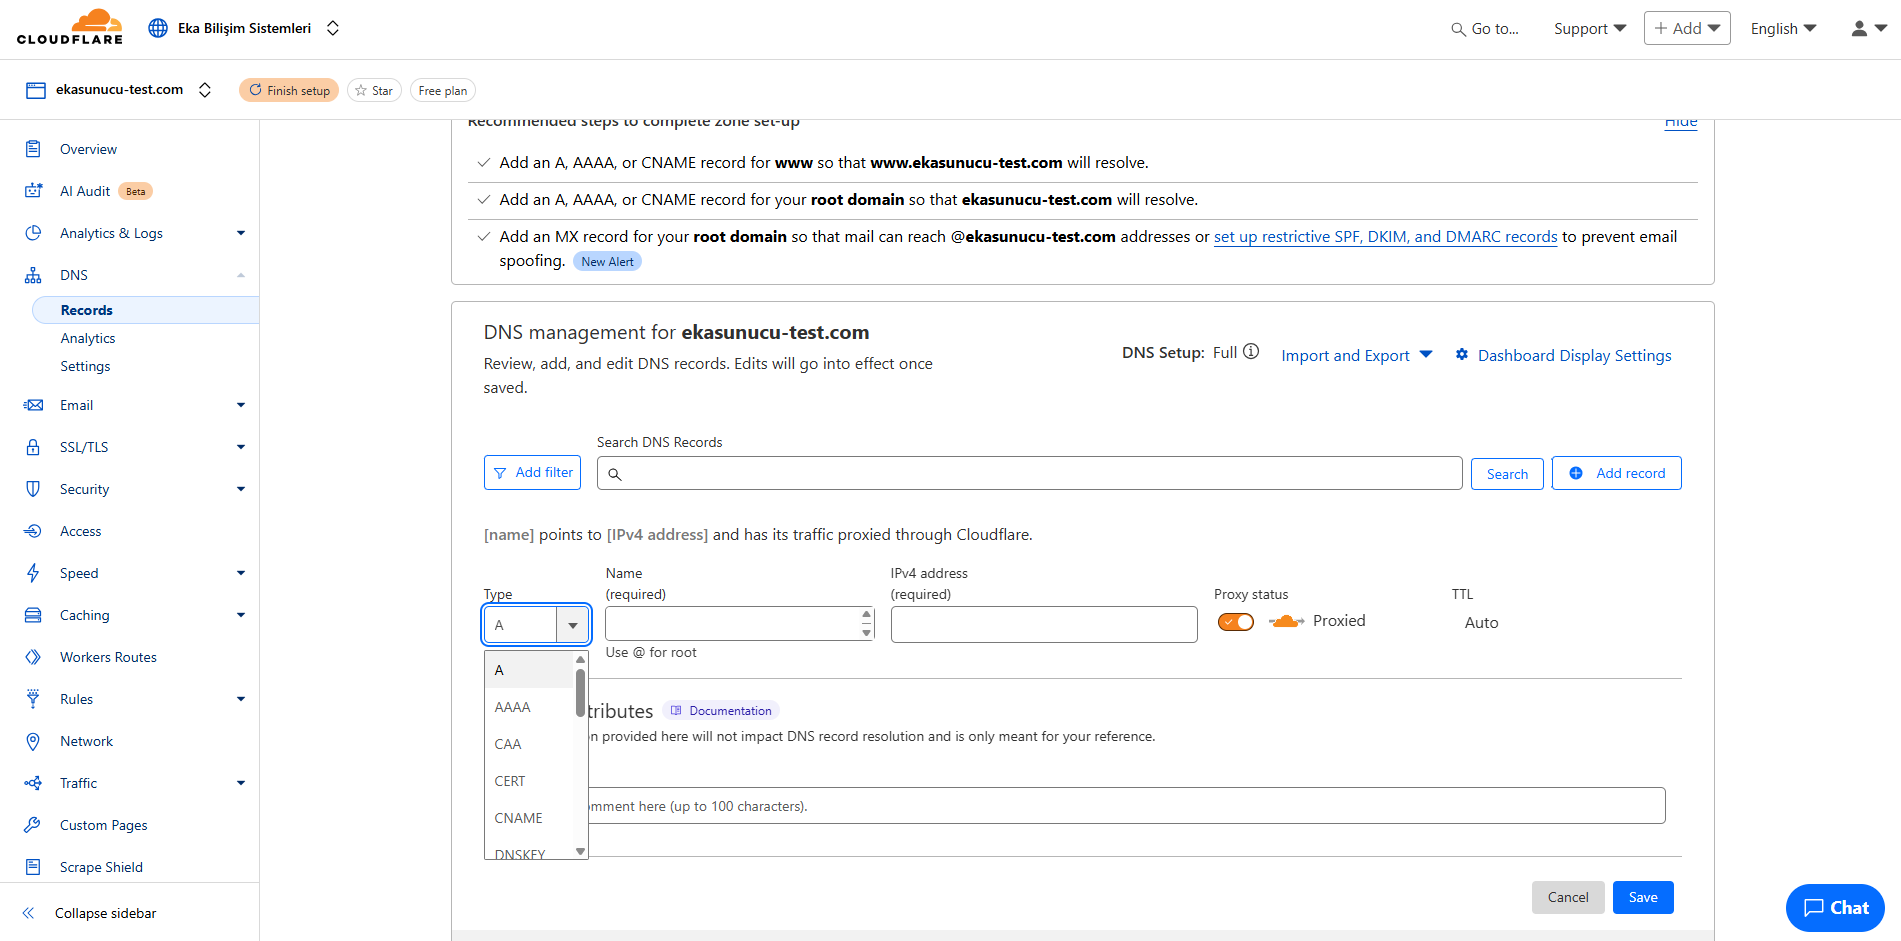
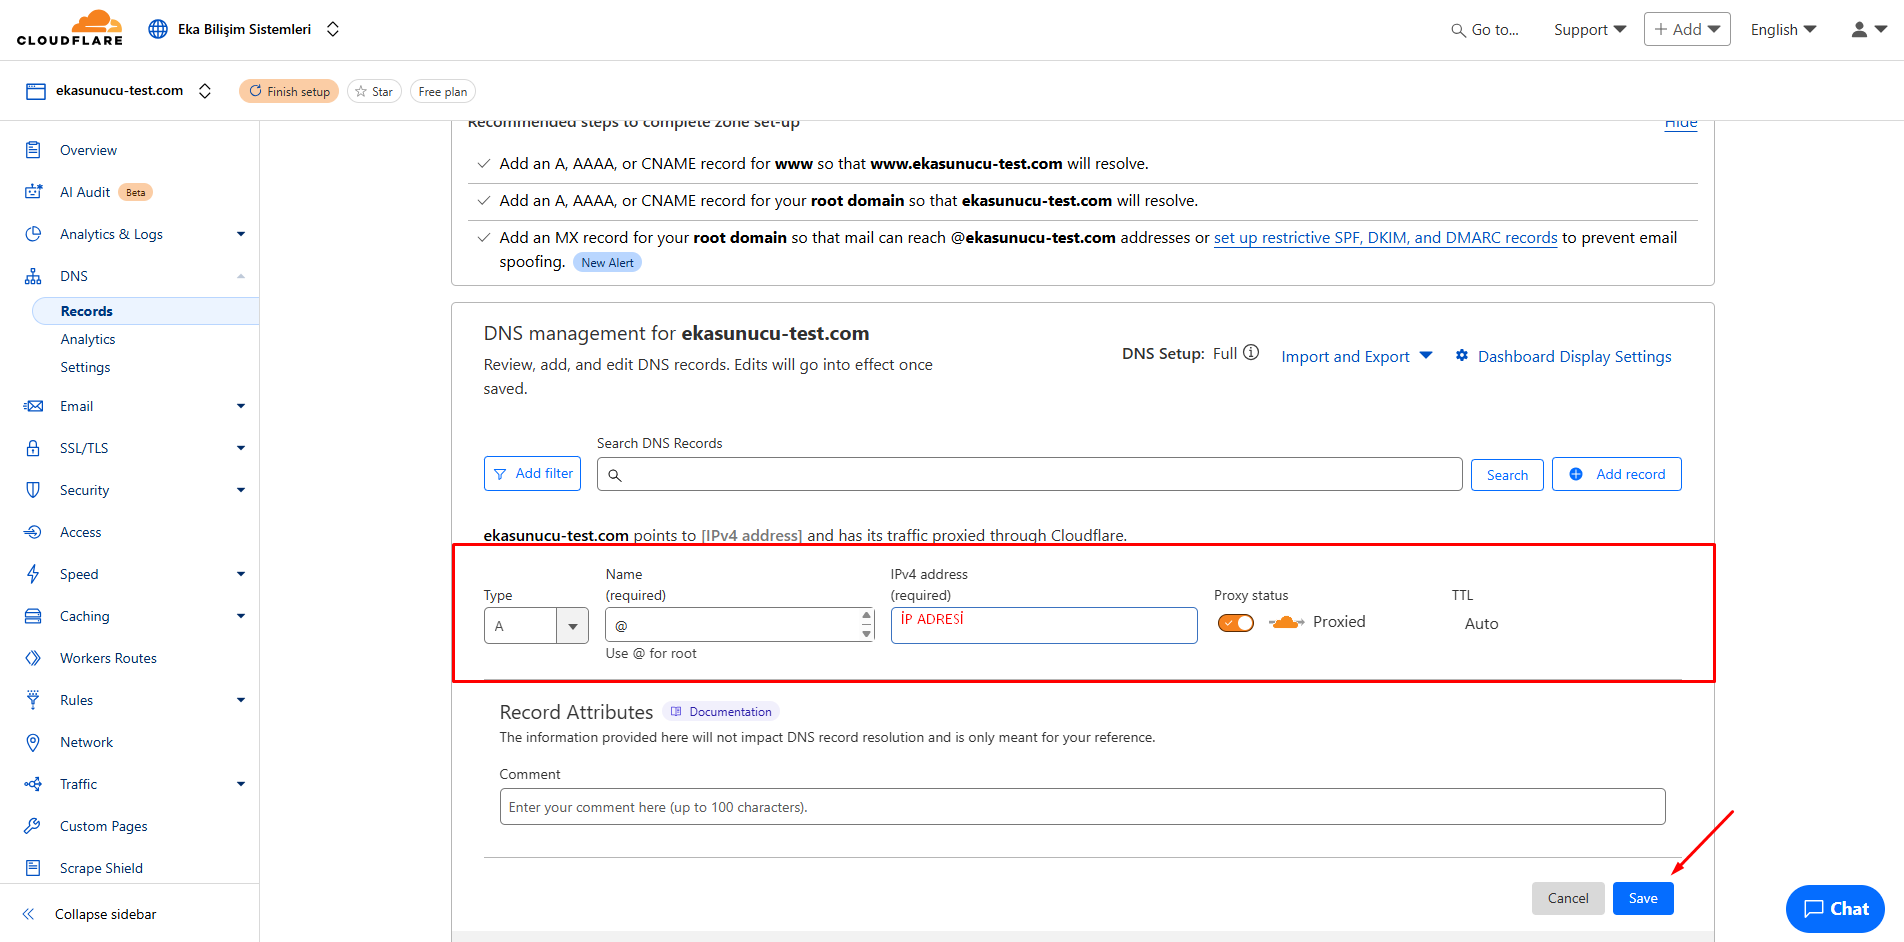
The A record is used to point your domain (for example example.com) to an IPv4 address (for example 192.0.2.1). This is the most basic way to indicate where your website is hosted.
In your Cloudflare control panel, after selecting your site, from the left menu "DNS" Click the tab.
In the DNS management panel "Add record" Click the (Add Record) button.
From the menu that opens "Type" in (Type) field "A" Select .
"Name" In the (Name) field you can enter:
"IPv4 address" In the (IPv4 address) field, enter the IP address of your server (for example 192.0.2.1).
"Proxy status" There are two options for (Proxy status):
Usually for web servers proxied option is recommended.
"TTL" The (Time To Live) value specifies how long the DNS record will be kept in the cache. For a proxy record, this field is determined automatically and cannot be changed.
"Save" Create your A record by clicking the (Save) button. The recording will start spreading across Cloudflare's global network within a few seconds.
CNAME (Canonical Name) record is used to point one domain name to another domain name. This record type is useful when you want to associate a single resource with multiple domains.
In your Cloudflare control panel, after selecting your site, from the left menu "DNS" Click the tab.
In the DNS management panel "Add record" Click the (Add Record) button.
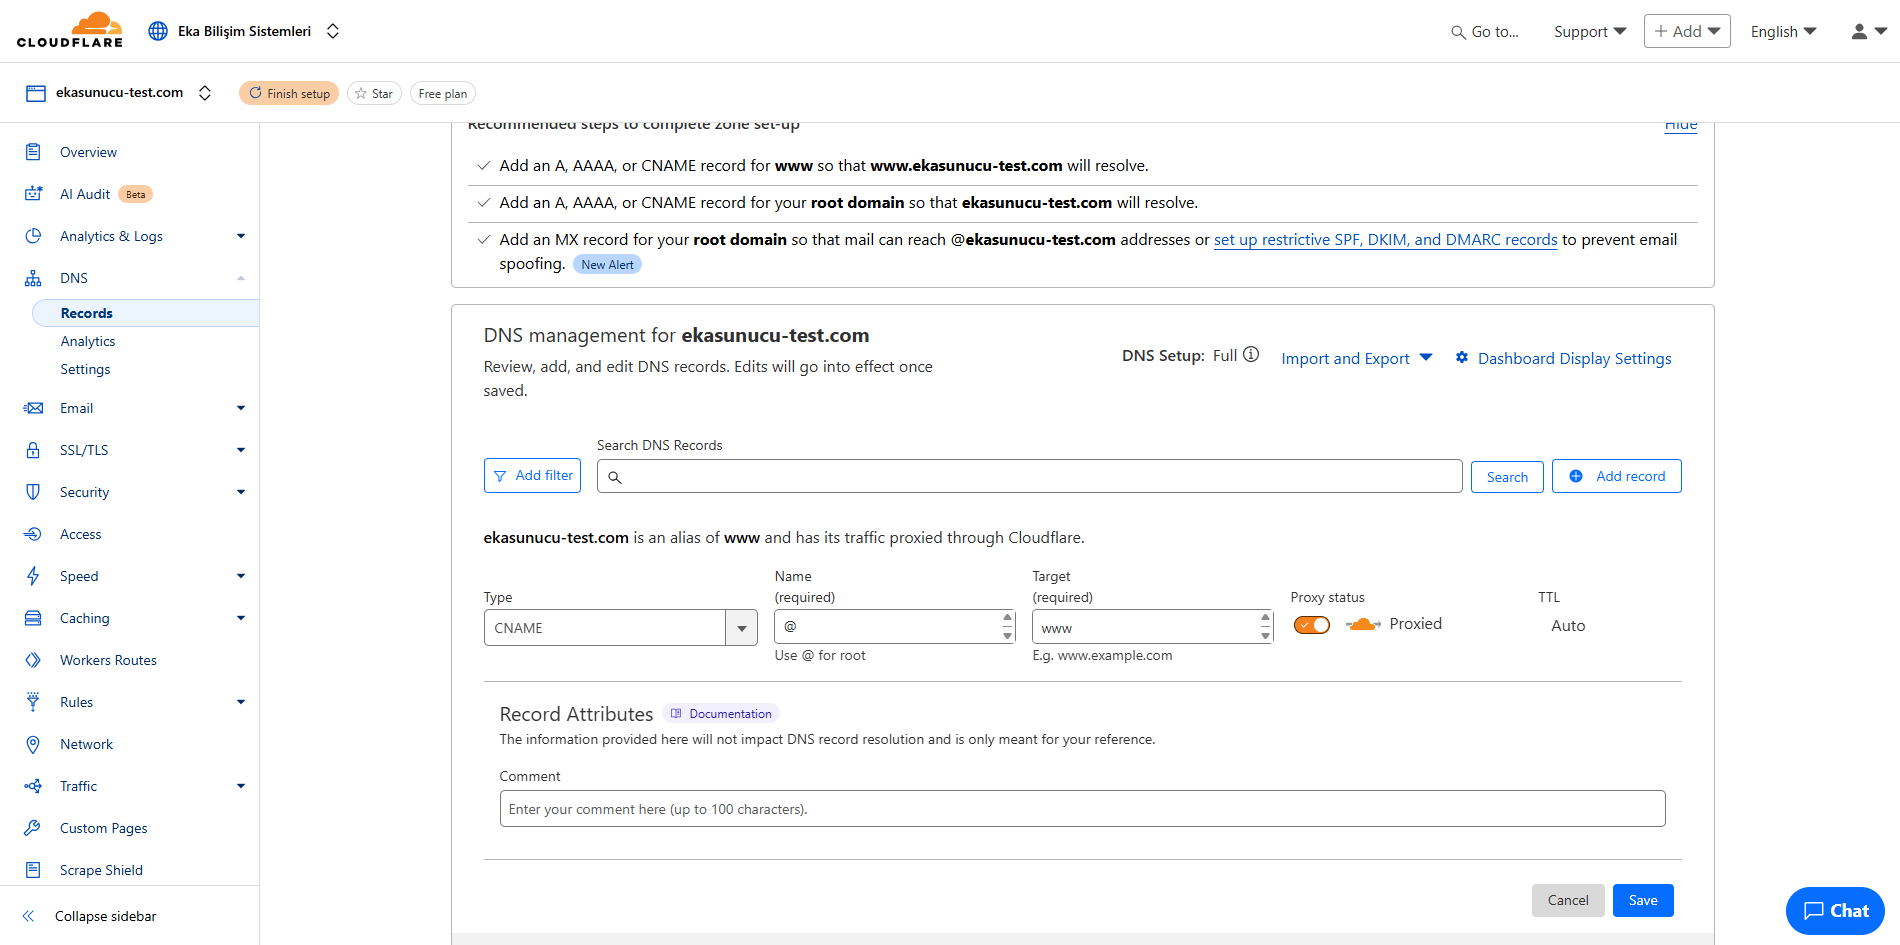
From the menu that opens "Type" in (Type) field "CNAME" Select .
"Name" In the (Name) field, enter the subdomain you want to create (for example: blog).
"Target" In the (Target) field, enter the target domain to redirect to. This must be a full domain name (for example: example.com or subdomain.example.com).
You can specify proxy status for CNAME records as well as for A records:
If you selected the Proxied option, the TTL value is set automatically. If you selected DNS only, you can specify the TTL value manually.
"Save" Create your CNAME record by clicking the (Save) button.
| CNAME Record | A Record |
|---|---|
| Redirects domain name to another domain name | Redirects the domain name to an IP address |
| Automatically updates if target IP changes | Manual update required if target IP changes |
| Cannot be used for root domain (apex domain) | Available for root domain |
| 3, such as CDN, email marketing. Ideal for integration with party services | Ideal for web hosting |
1 ASPMX.L.GOOGLE.COM5 ALT1.ASPMX.L.GOOGLE.COM5 ALT2.ASPMX.L.GOOGLE.COM10 ALT3.ASPMX.L.GOOGLE.COM10 ALT4.ASPMX.L.GOOGLE.COM0 example-com.mail.protection.outlook.com10 mx.zoho.com20 mx2.zoho.com50 mx3.zoho.comMX (Mail Exchange) records are DNS records that specify where email traffic should be directed. These records ensure that incoming mail to email addresses associated with your domain is forwarded to the correct email server.
In your Cloudflare control panel, after selecting your site, from the left menu "DNS" Click the tab.
In the DNS management panel "Add record" Click the (Add Record) button.
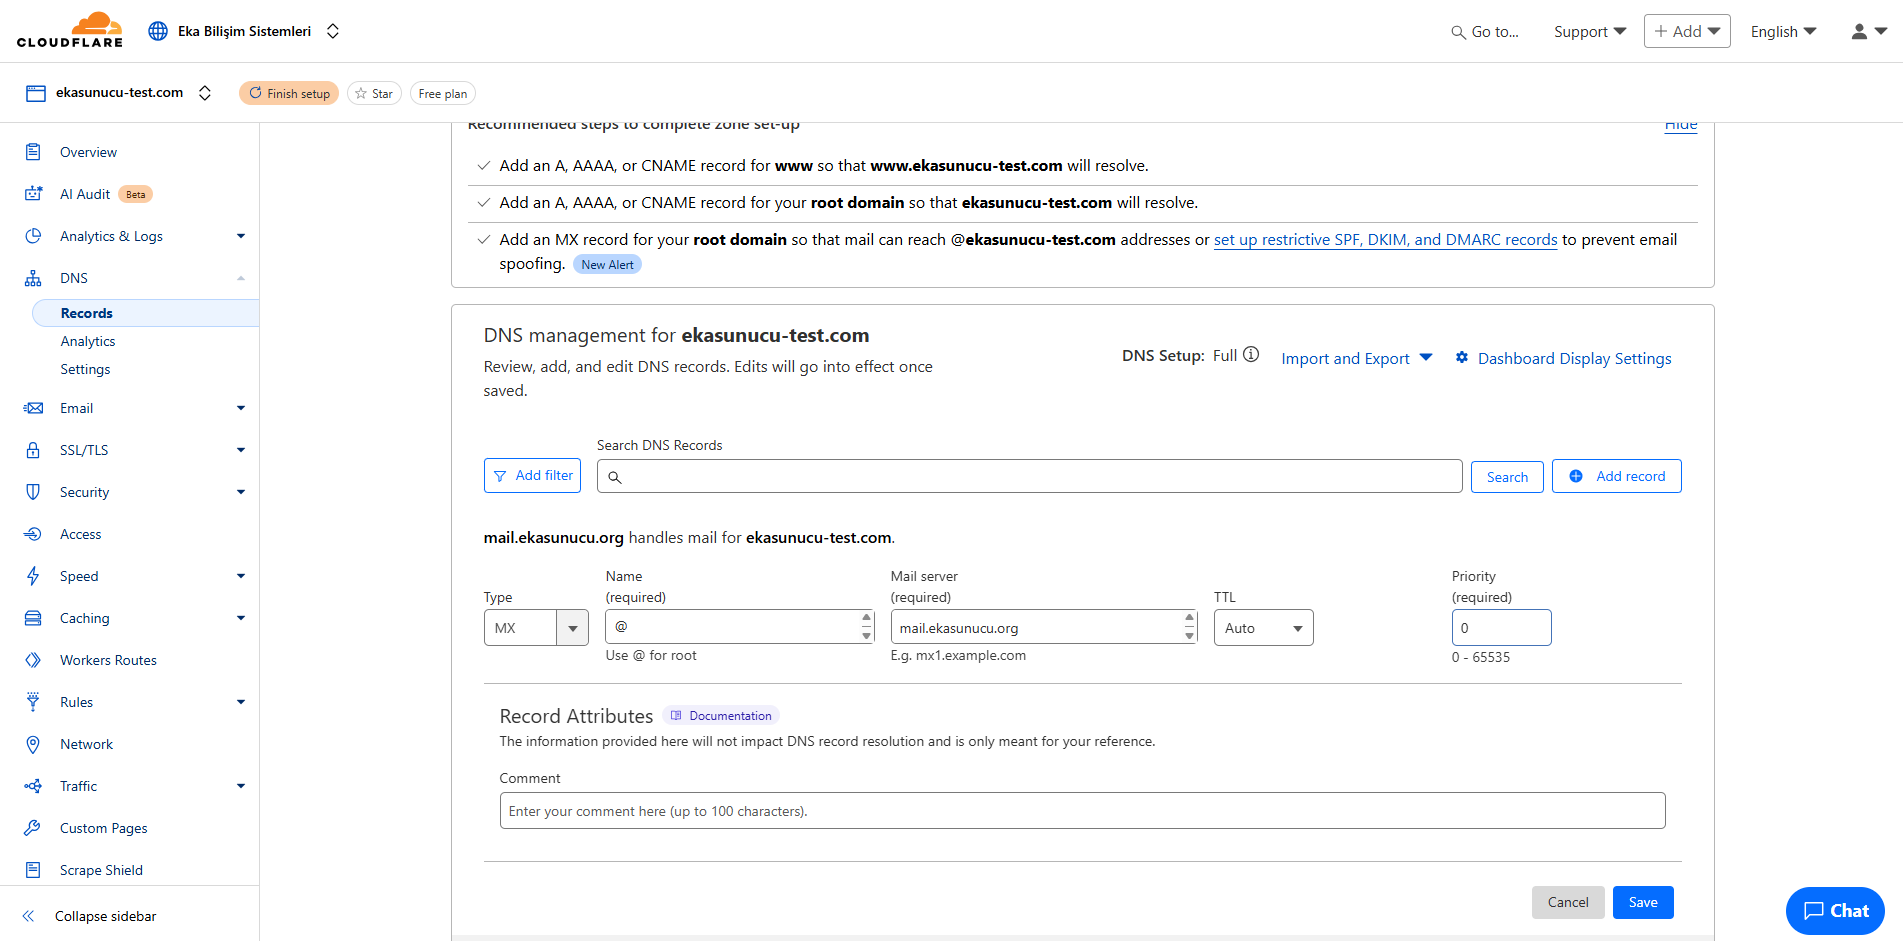
From the menu that opens "Type" in (Type) field "MX" Select .
"Name" If you are configuring the (Name) field for the part of the email address after the '@' sign, usually for the main domain @ or left blank. If you are configuring email for a subdomain (e.g. mail.example.com), you can type that subdomain.
"mail server" In the (Mail server) field, enter the mail server address provided to you by your e-mail service provider (e.g. mx1.example-mail.com).
"priority" The (Priority) field specifies which mail server to use first when you have more than one MX record. A lower number indicates a higher priority.
For example:
Proxy status for MX records is usually "DNS only" It should be set to (DNS only). Email traffic should not go through the Cloudflare proxy but should be directed directly to the mail server.
For the TTL (Time To Live) value, the "Automatic" option is generally suitable.
"Save" Create your MX record by clicking the (Save) button.
Your email service provider may often require you to add more than one MX record. Repeat these steps for each record.
TXT (Text) records are DNS records that allow you to add text-based information to your domain. These records are often used for email verification, validating domain ownership, and configuring other web services.
In your Cloudflare control panel, after selecting your site, from the left menu "DNS" Click the tab.
In the DNS management panel "Add record" Click the (Add Record) button.
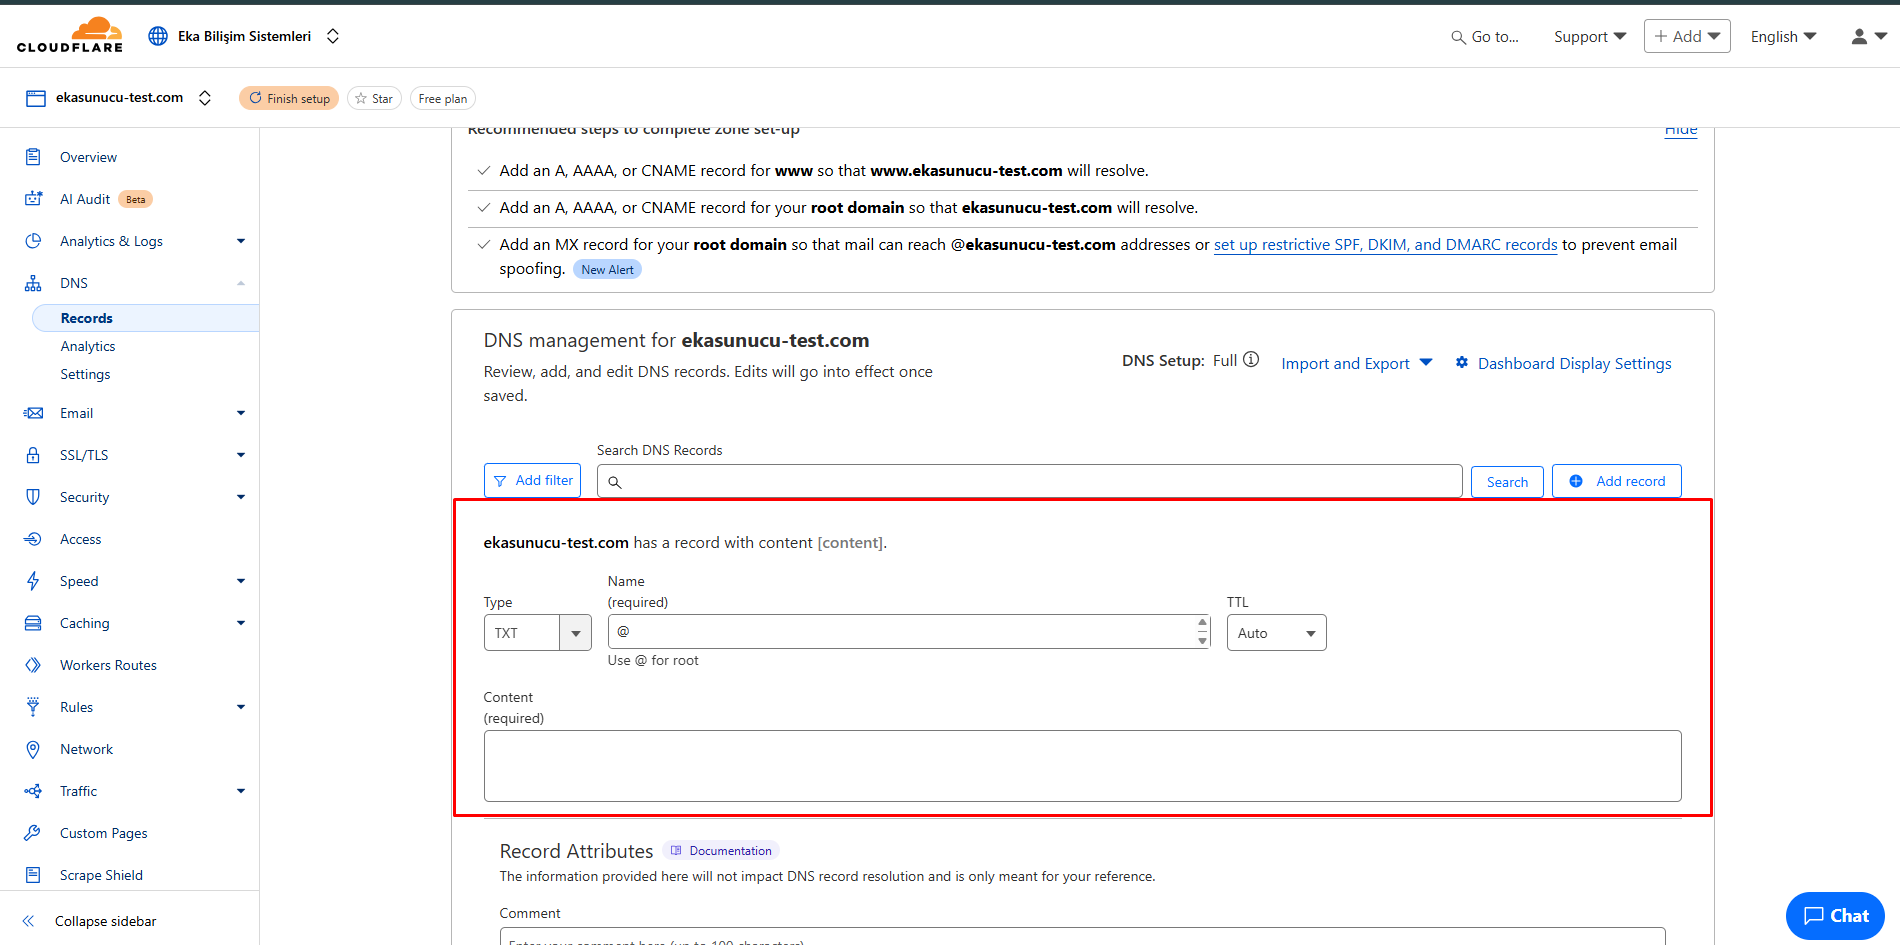
From the menu that opens "Type" in (Type) field "TXT" Select .
"Name" In the (Name) field you can enter:
"Content" In the (Content) field, enter the text value given to you by your service provider. This should usually be in a specific format.
For TXT records usually "Auto" (Automatic) TTL value is sufficient. This allows Cloudflare to determine the optimal cache duration.
Proxy status for TXT records is usually "DNS only" (DNS only) because these record types are not directly related to web traffic.
"Save" Create your TXT record by clicking the (Save) button. The recording will spread across Cloudflare's global network within minutes.
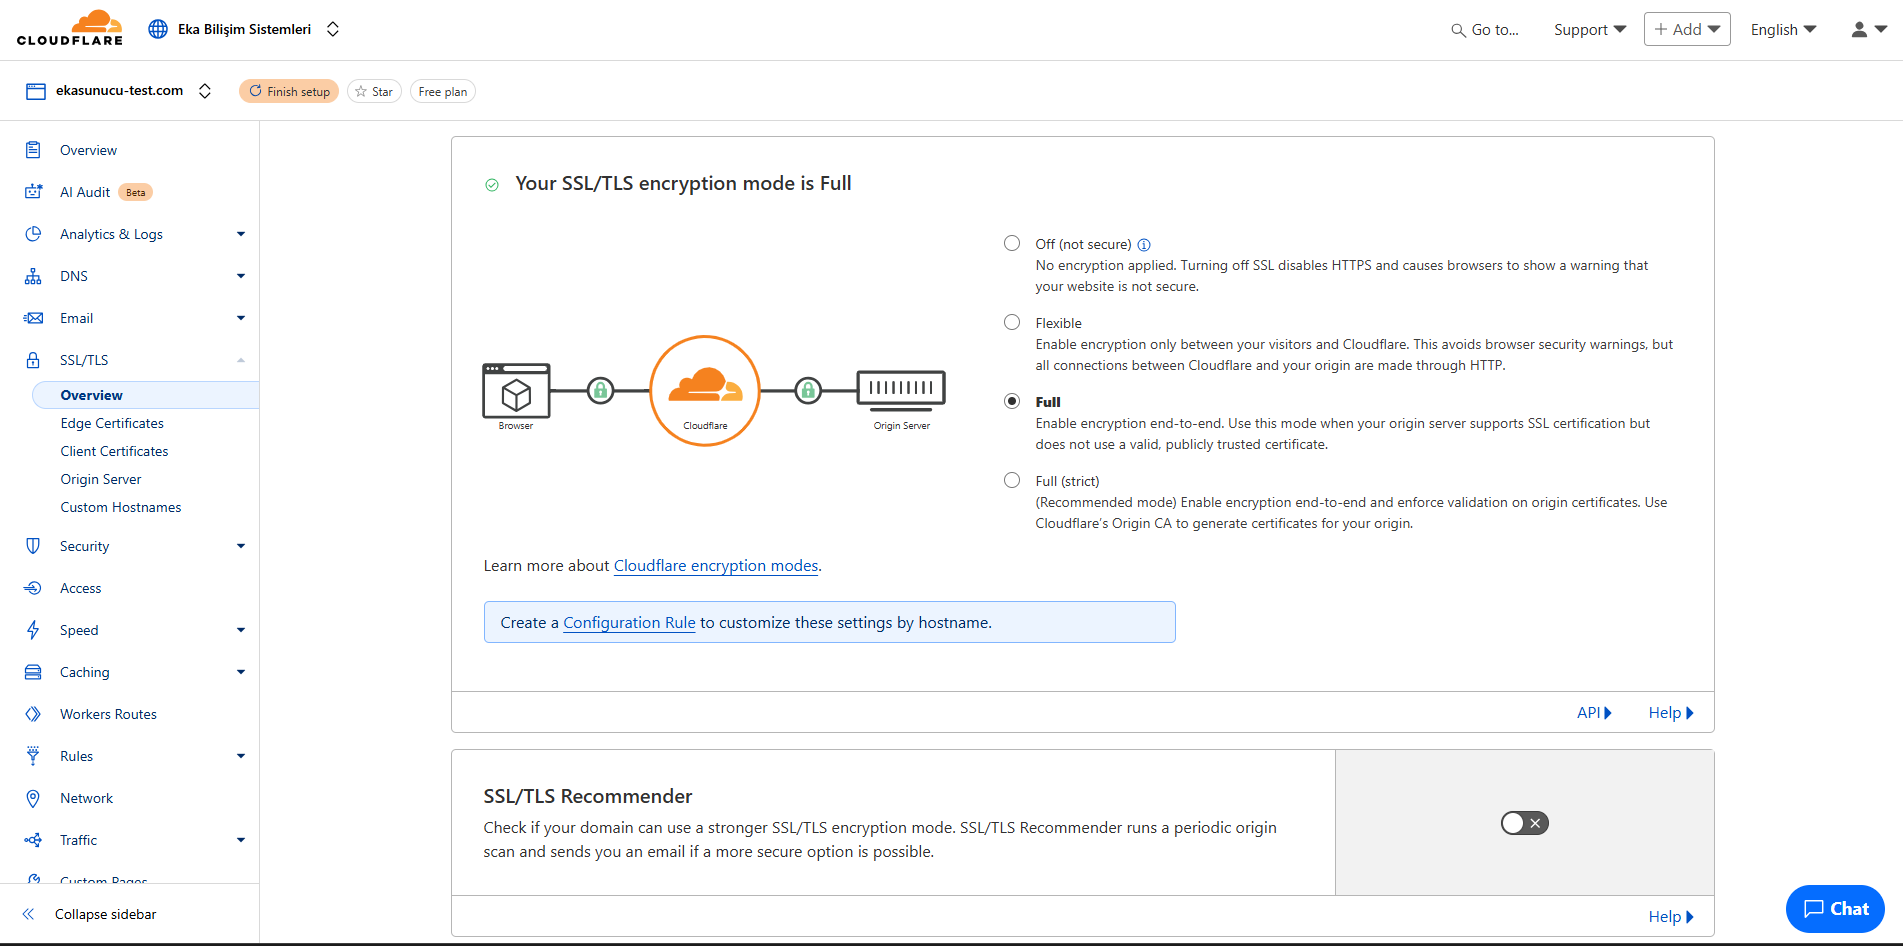
SSL/TLS is a protocol that encrypts communication between your website and visitors. Cloudflare allows you to enable HTTPS by offering a free SSL certificate to all websites.
In your Cloudflare control panel, after selecting your site, from the left menu "SSL/TLS" Click the tab.
In the General tab, "SSL/TLS encryption mode" In the (SSL/TLS encryption mode) section, select the SSL mode best suited for your site:
Go to the Edge Certificates tab and "Always Use HTTPS" Enable (Always Use HTTPS). This automatically redirects all requests made over HTTP to HTTPS.
To increase the security level, "Minimum TLS Version" You can set (Minimum TLS Version) to TLS 1.2 or higher. This disables old and insecure versions of TLS.
"Automatic HTTPS Rewrites" Enable (Automatic HTTPS Rewrites). This prevents "mixed content" errors by automatically converting HTTP links on your page to HTTPS.
If you want to install a custom SSL certificate, "Origin Server" You can install your own SSL certificate by going to the (Source Server) tab. Alternatively, you can use Cloudflare's free Origin CA certificate.
For advanced security "HSTS" You can enable HSTS by going to the tab. This tells browsers that your site should always be accessed over HTTPS. But be careful, make sure SSL is working completely correctly before making this setting.
Cloudflare uses WAF (Web Application Firewall) to secure your website. WAF is designed to detect and block attacks against web applications. This increases the security of your website and protects your users' data.
Here are some important features used in Cloudflare WAF:
Basic WAF rules are used to secure your website. These rules protect your users' data while increasing the security of your website.
Advanced WAF rules are used to further increase the security of your website. These rules increase the security of your website, protect your users' data, and do not affect the performance of your web applications.
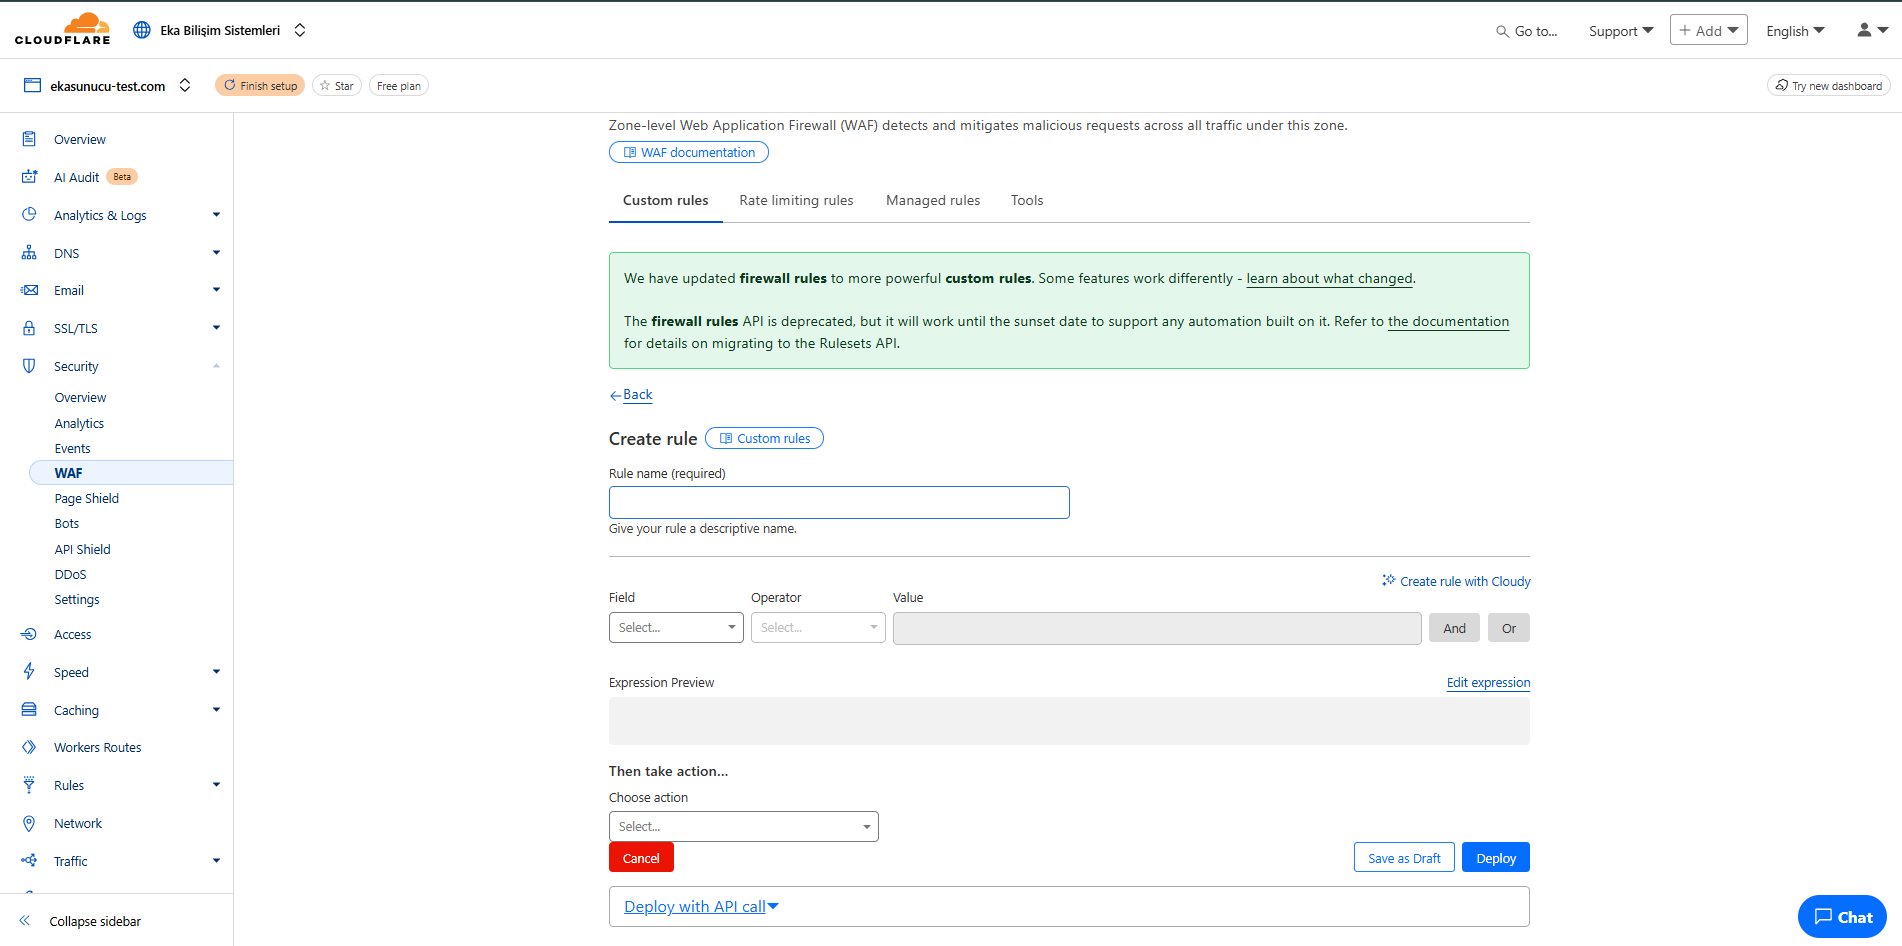
Cloudflare uses page rules to improve the security and performance of your website. These rules increase the security of your website, protect your users' data, and do not affect the performance of your web applications.
Here are some important features used in Cloudflare page rules:
Security rules are used to ensure the security of your website. These rules increase the security of your website, protect your users' data, and do not affect the performance of your web applications.
Performance rules are used to improve the performance of your website. These rules improve the performance of your website, protect your users' data, and do not affect the performance of your web applications.
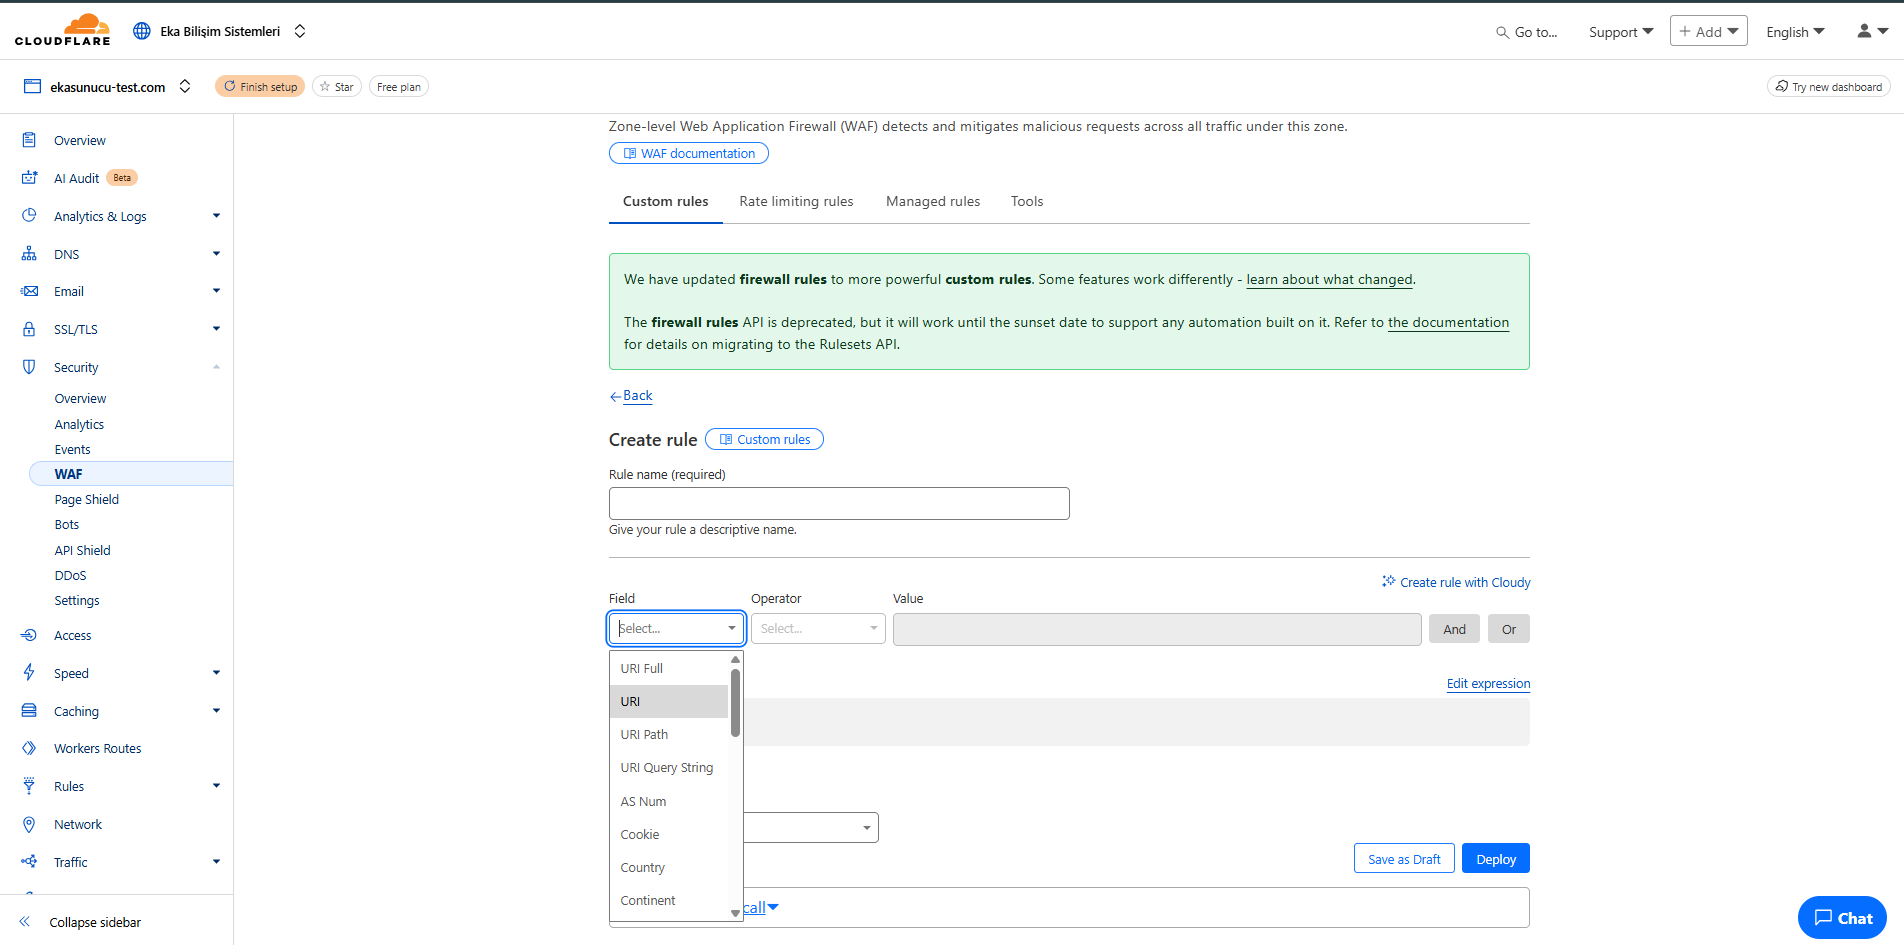
Cloudflare Tunnel (formerly Argo Tunnel) is a solution for making your servers securely accessible over the internet. Tunnel allows you to expose your web services to the internet without traditional port forwarding or firewall rules by establishing a secure connection from your server to the outside.
Cloudflare Tunnel installation, cloudflared It uses a daemon software called . This software creates a secure tunnel from your server to Cloudflare's edge network. Below you can find detailed installation steps:
Download and install the cloudflared tool appropriate for your operating system:
# Gerekli paketleri indirin
curl -L https://github.com/cloudflare/cloudflared/releases/latest/download/cloudflared-linux-amd64.deb -o cloudflared.deb

# Paketi kproduct
sudo dpkg -i cloudflared.deb

# Setupu verify
cloudflared version# Binary dosyasını indirin
curl -L https://github.com/cloudflare/cloudflared/releases/latest/download/cloudflared-linux-x86_64 -o cloudflared
# Çalıştırma izinleri atayın
chmod +x cloudflared
# Binary dosyasını sistem dizinine taşıyın
sudo mv cloudflared /usr/local/bin/
# Setupu verify
cloudflared versionfor windows GitHub Download the latest version (.exe) from the page and run it.
# Homebrew ile kurulum
brew install cloudflare/cloudflare/cloudflared

# Setupu verify
cloudflared versionYou need to associate the Cloudflared tool with your Cloudflare account:
# Cloudflare hesabınızla oturum açın
cloudflared tunnel login
This command will open a login page in your browser. Log in with your Cloudflare account and confirm the requested permissions. When the process is successful, a certificate file (~/.cloudflared/cert.pem) will be automatically created.
Now let's create a permanent tunnel:
# Yeni bir tünel createun (tünel adınızı belirleyin)
cloudflared tunnel create tunel-adi
This command UUID It will create and reflect a tunnel ID in format. Also, ~/.cloudflared/ in directory tunel-adi.json file will be created. This file contains tunnel credentials and should be stored securely.
Create the DNS record that will connect the tunnel to your domain:
# Tunnel for DNS kaydı createun
cloudflared tunnel route dns tunel-adi uygulama.alan-adiniz.com
This command uygulama.alan-adiniz.com It creates a CNAME record that connects the subdomain to your tunnel. Now, traffic coming to this subdomain will be routed to your server through the tunnel.
Create a configuration file that specifies how the tunnel will work. to this file config.yml give name:
# ~/.cloudflared/config.yml dosyası

tunnel: tunel-adi-veya-id
credentials-file: /root/.cloudflared/tunel-adi.json

# Gelen trafiği nereye yönlendireceğinizi belirtin
ingress:
  # Web uygulaması for yapılandırma
  - hostname: uygulama.alan-adiniz.com
    service: http://localhost:8080

  # Başka bir servis for
  - hostname: ikinci.alan-adiniz.com
    service: http://localhost:3000

  # Catch-all kural (varsayılan yönlendirme)
  - service: http_status:404
In this configuration file:
tunnel: Tunnel name or IDcredentials-file: 3. Path to the credentials file created in stepingress: Rules that specify how incoming traffic should be routedNow you can run the tunnel:
# Tüneli çalıştırın
cloudflared tunnel run tunel-adi
This command starts the tunnel and keeps it running. In the console, you can see the status of the tunnel connection and incoming requests.
Create a systemd service so that the tunnel starts automatically when the server is restarted:
# Servis dosyası createun
sudo nano /etc/systemd/system/cloudflared.service
Add the following content to the file:
[Unit]
Description=Cloudflare Tunnel
After=network.target

[Service]
User=root
WorkingDirectory=/root/.cloudflared
ExecStart=/usr/local/bin/cloudflared tunnel run tunel-adi
Restart=always
RestartSec=5

[Install]
WantedBy=multi-user.target
Enable and start the service:
# Systemd'yi yeniden yükleyin
sudo systemctl daemon-reload

# Servisi etkinleştirin (sistem açılışında otomatik başlaması for)
sudo systemctl enable cloudflared

# Servisi başlatın
sudo systemctl start cloudflared

# Servisin durumunu kontrol edin
sudo systemctl status cloudflaredcloudflared tunnel --url http://localhost:3000 You can share your local development environment over the internet by creating a temporary tunnel with the command.sudo journalctl -u cloudflared -f You can constantly monitor service logs with the command.tunel-adi.json) keep safe and backed up. If this file is lost, you will need to rebuild the tunnel and update the DNS records. 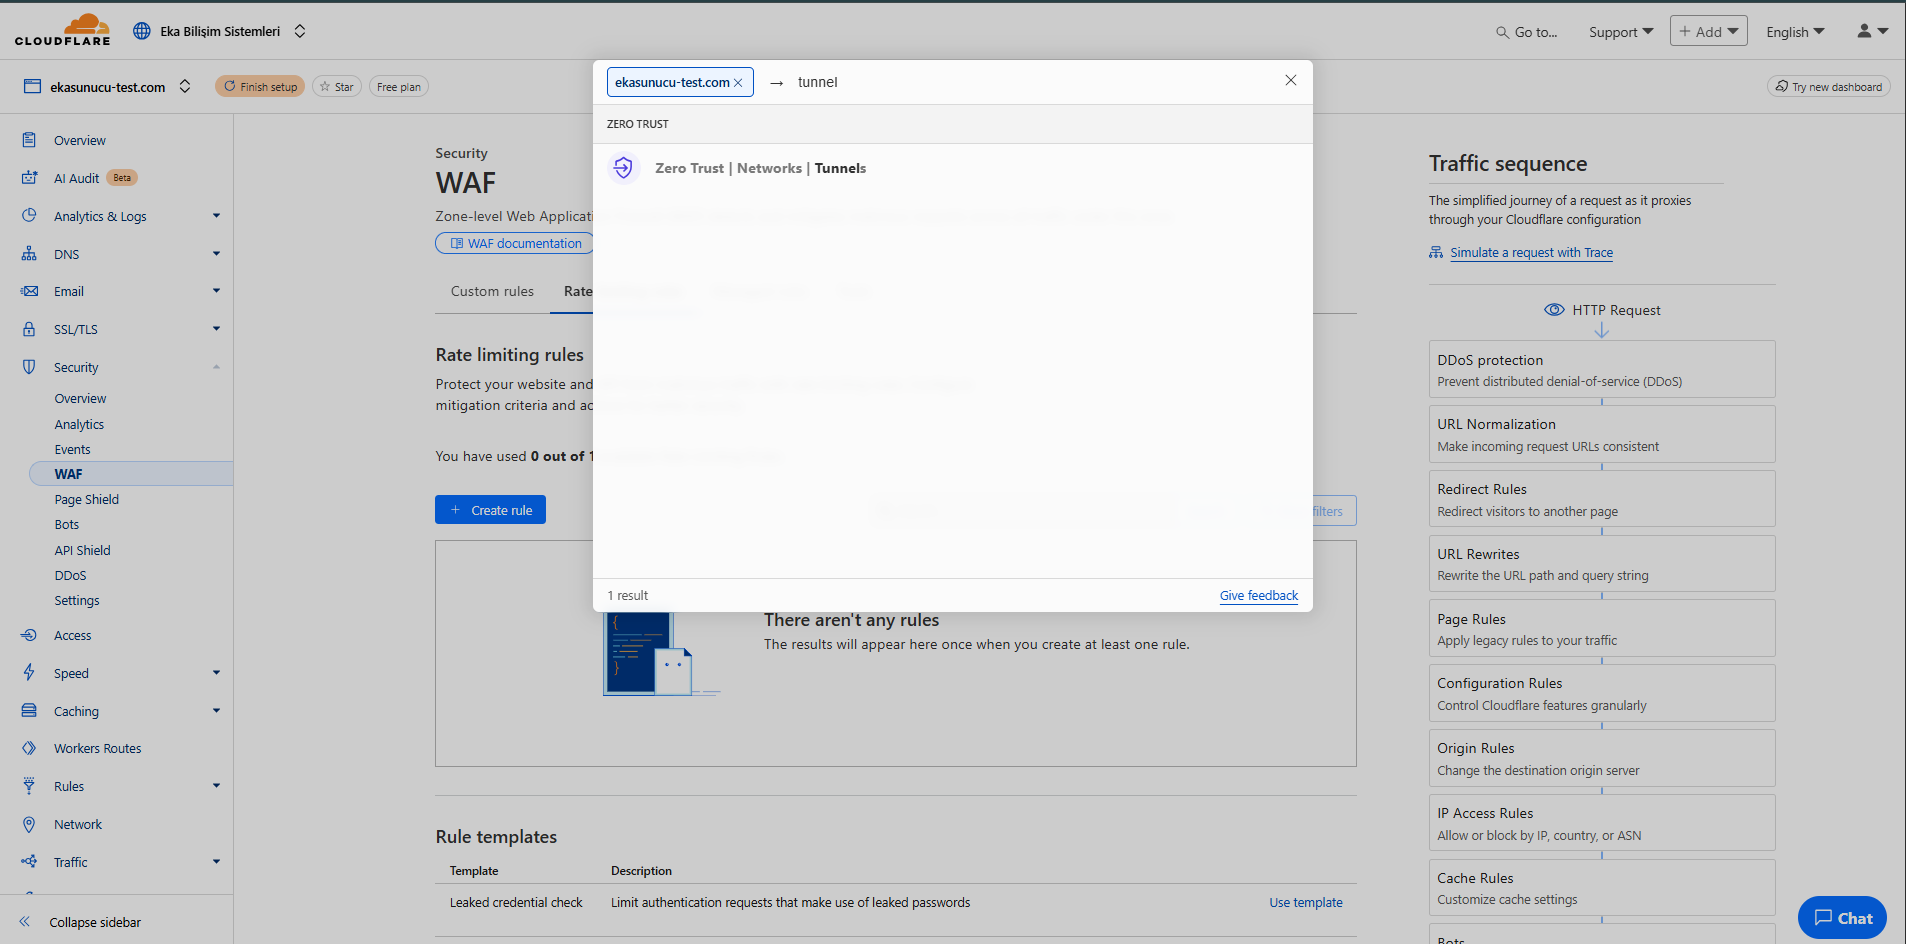
Cloudflare uses caching and optimization settings to improve your website's performance. These settings improve the performance of your website, protect your users' data, and do not affect the performance of your web applications.
Here are some important features used in Cloudflare caching and optimization settings:
Cache settings are used to improve the performance of your website. These settings improve the performance of your website, protect your users' data, and do not affect the performance of your web applications.
Optimization settings are used to improve the performance of your website. These settings improve the performance of your website, protect your users' data, and do not affect the performance of your web applications.
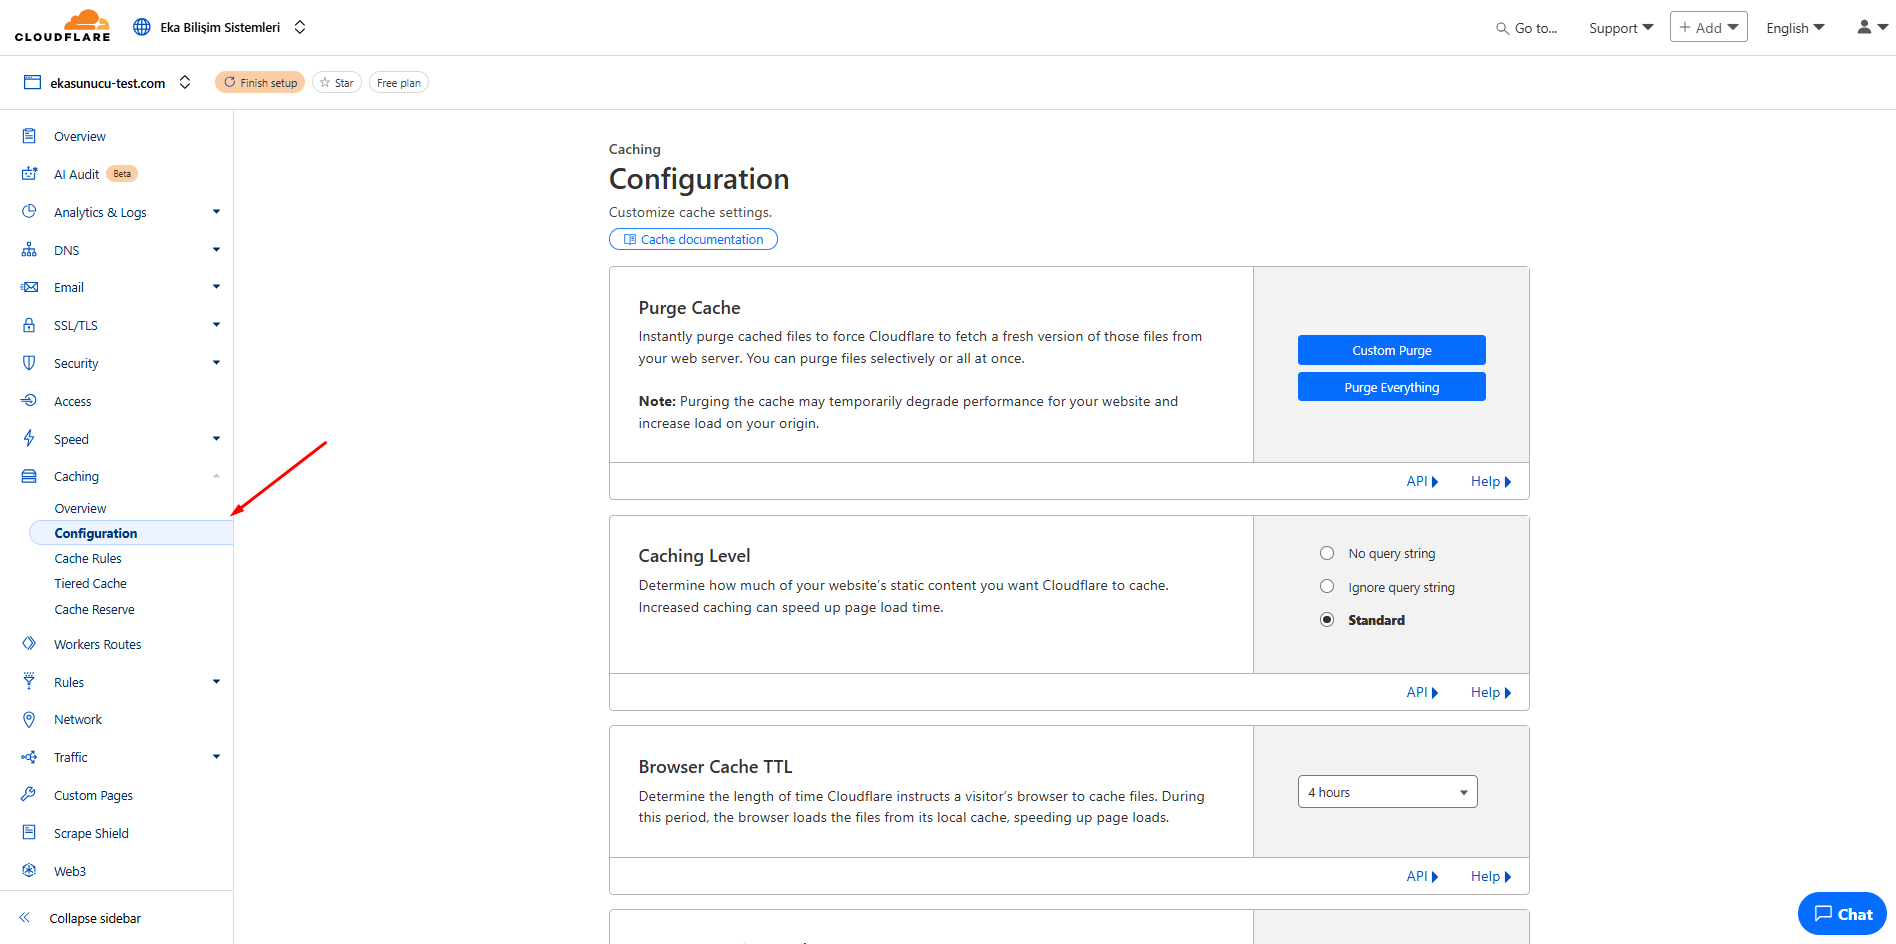
You can find answers to frequently asked questions about Cloudflare. This information will help you understand all the features of Cloudflare and improve your website's security and performance.
Cloudflare offers DNS management, WAF (Web Application Firewall), Tunneling, SSL certificate, CDN and more in a single platform. These features increase the security and performance of your website, protect your users' data, and do not affect the performance of your web applications.
Cloudflare offers DNS management, WAF (Web Application Firewall), Tunneling, SSL certificate, CDN and more in a single platform. These features increase the security and performance of your website, protect your users' data, and do not affect the performance of your web applications.
Cloudflare offers DNS management, WAF (Web Application Firewall), Tunneling, SSL certificate, CDN and more in a single platform. These features increase the security and performance of your website, protect your users' data, and do not affect the performance of your web applications.
This page gives you a comprehensive understanding of all the features of Cloudflare. You can quickly reach the section you want by using the content map below.
 Turkey (Turkish)
 Germany (German)
 Worldwide (English)

